Top 10 best things to do in Iceland on a budget

In this guest blog post Rayburn Tours share some great ways to spend time in Iceland on a budget. You can follow Rayburn Tours on Twitter via @RayburnEdu. Find out more about school trips to Iceland with Rayburn Tours.

Ok, it’s unlikely that a full on adventure to Iceland is going to be a cheap getaway, but this land of spectacular natural beauty has so much to offer visitors without breaking the bank. Any adventurer will be spoilt for choice with steaming hot springs, crashing waterfalls, glistening glaciers and powerful volcanoes – all of which are low-cost options.

So we’ve put together our top 10 recommendations for a school geography trip to Iceland that’ll leave your students wowed (without blowing the budget!).

1.   Visit one of the local swimming pools
A nation of bathing lovers, Icelanders lap up swimming pools, hot tubs and natural springs. Often geothermally heated and surrounded by stunning scenery, make a splash on your adventure with a visit to a local swimming pool.

Whilst a visit to the Blue Lagoon is popular among tourists, there are plenty of cheaper alternatives. Whether you take a dip in one of Iceland’s oldest hot springs – the magical Secret Lagoon – or you dive into one of the many local pools, a swim is a must on any Iceland bucket list.


2.   Walk along the boundary of the North American & Eurasian plates at Thingvellir
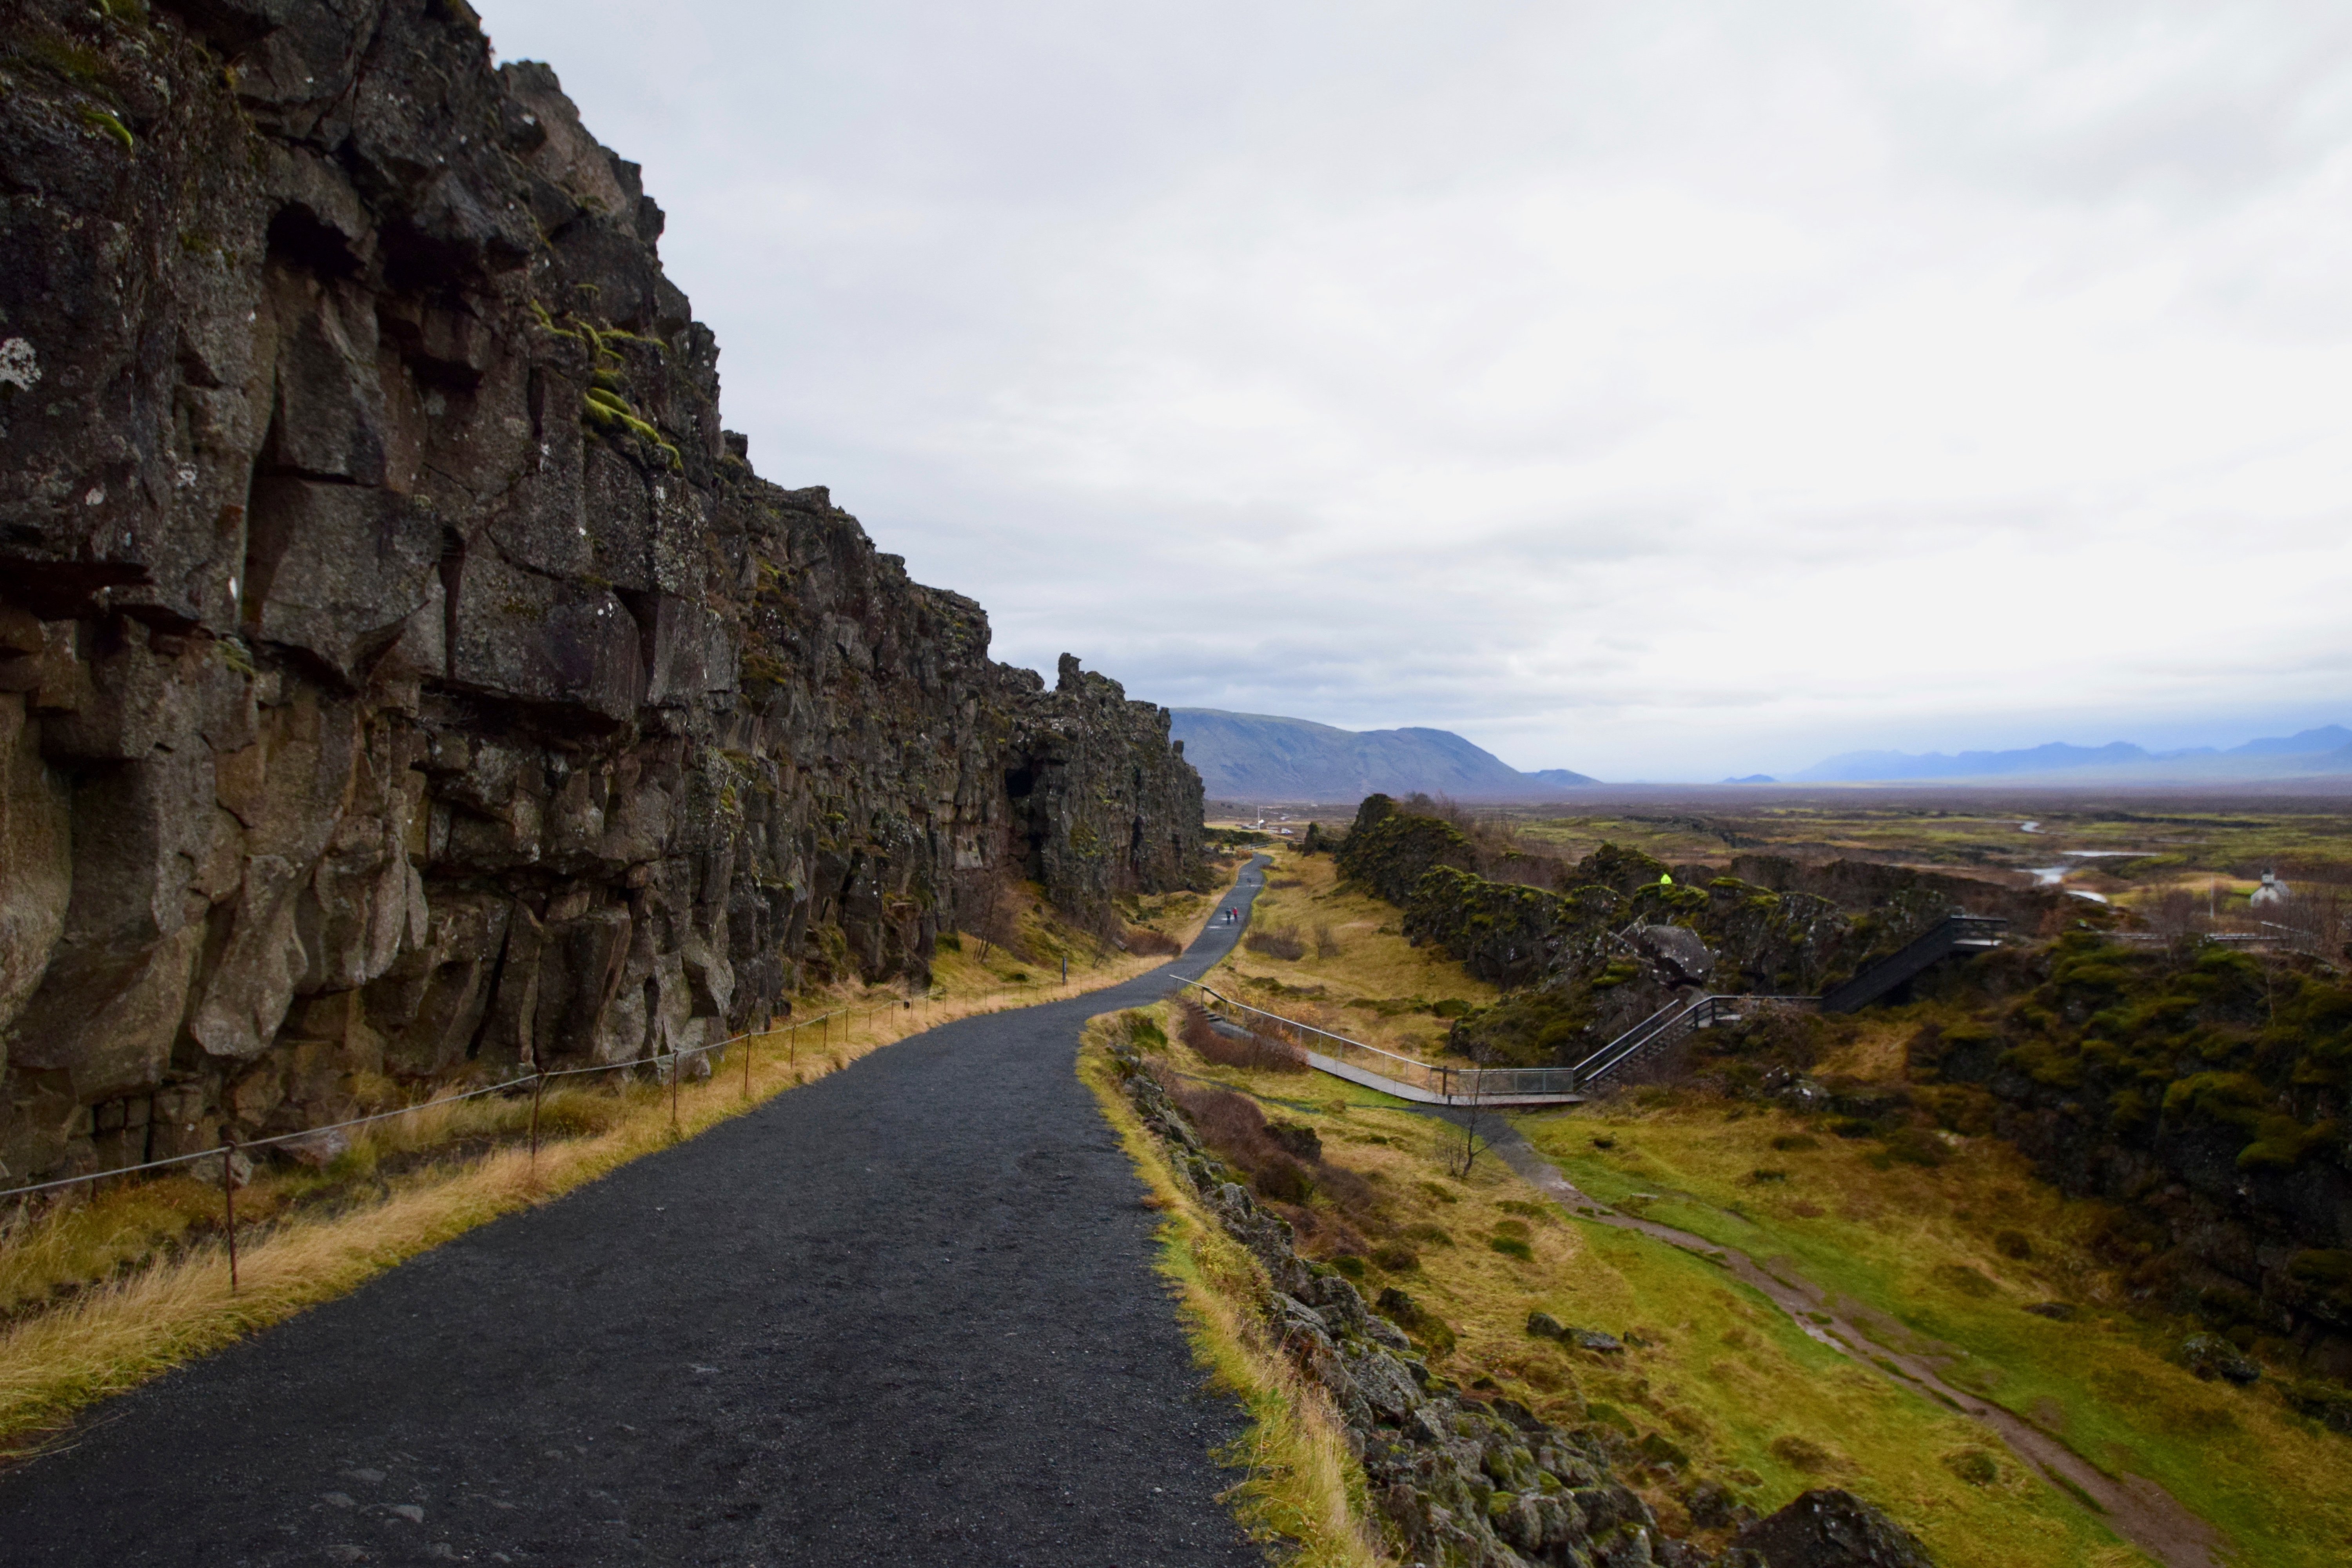
Pingvellir National Park

Pingvellir National Park, home to ‘The Wall’ from Game of Thrones

As one of Iceland’s most significant historical sites and part of the country’s famous Golden Circle tour, Thingvellir National Park is not to be missed. It’s one of the few places on earth where the Mid Atlantic Ridge is visible above sea level. Here you can venture between the rifts in the earth’s crust at the boundary of the Eurasian and North American tectonic plates.

3.   Experience hot springs and the hot river near Hveragerdi
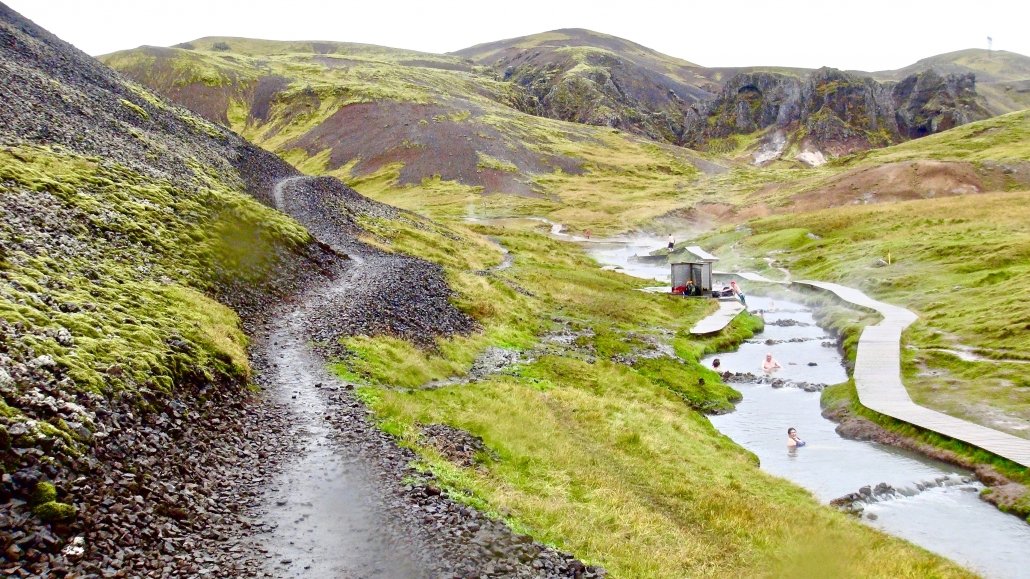
Iceland, Reykjadalur hot springs, Hveragerdi

The hot spring town of Hveragerði boasts an active geothermal area right in the centre of town. Whether you choose to take a dip in the hot river, or boil eggs and bake bread in the hot springs, there’s something to keep everyone entertained. Take a hike along one of the many walking trails and admire the surreal landscape, where white plumes of water vapour surge up into the sky from the surrounding hills.

4.   Witness glaciers before they disappear
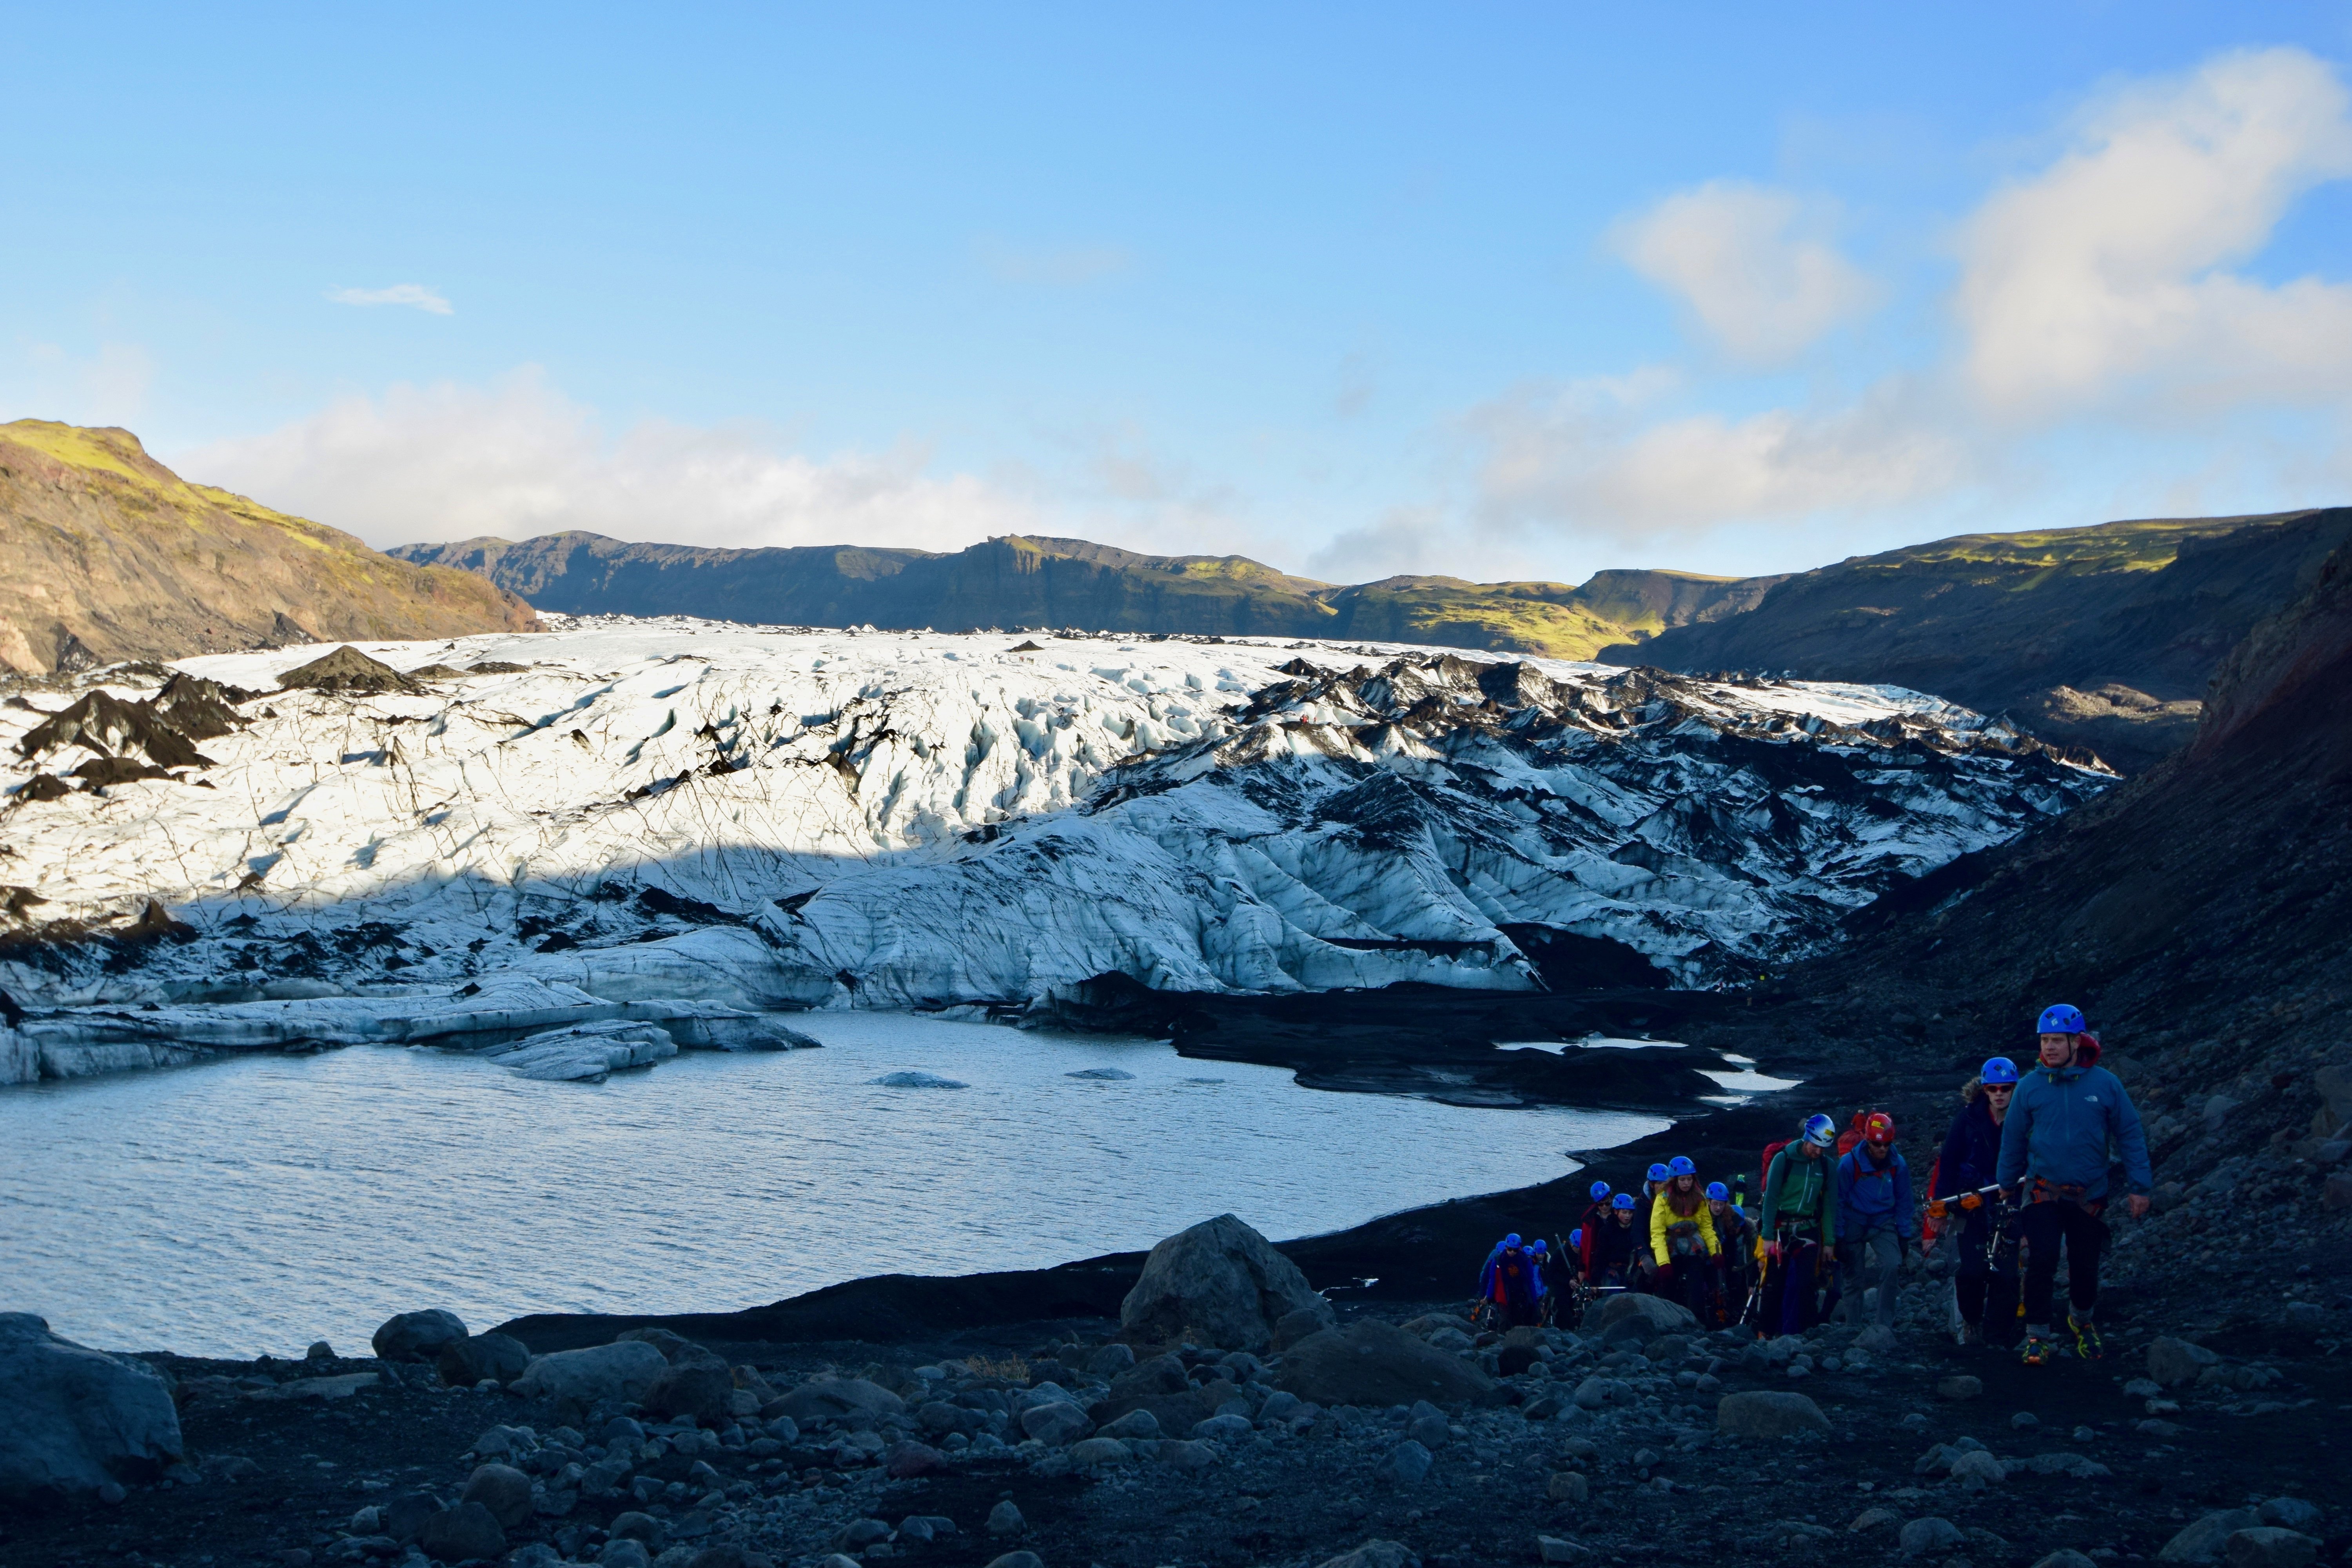
Sólheimajökull Glacier

Sólheimajökull Glacier

Iceland’s glaciers are a sight to behold and with the loss of the country’s first glacier – Okjökull– earlier this year, witnessing one of the remaining rivers of ice is all the more meaningful. With approximately 11% of the country’s landscape covered by ice caps, the remaining retreating glaciers bring home the effects of climate change and the importance of preserving these rivers of ice.

Whether you witness Iceland’s largest glacier, the mighty Vatnajökull, Snæfellsjökull or Langjökull, your students are certain to be blown away by the natural beauty.

5.   Don’t Do go chasing waterfalls!
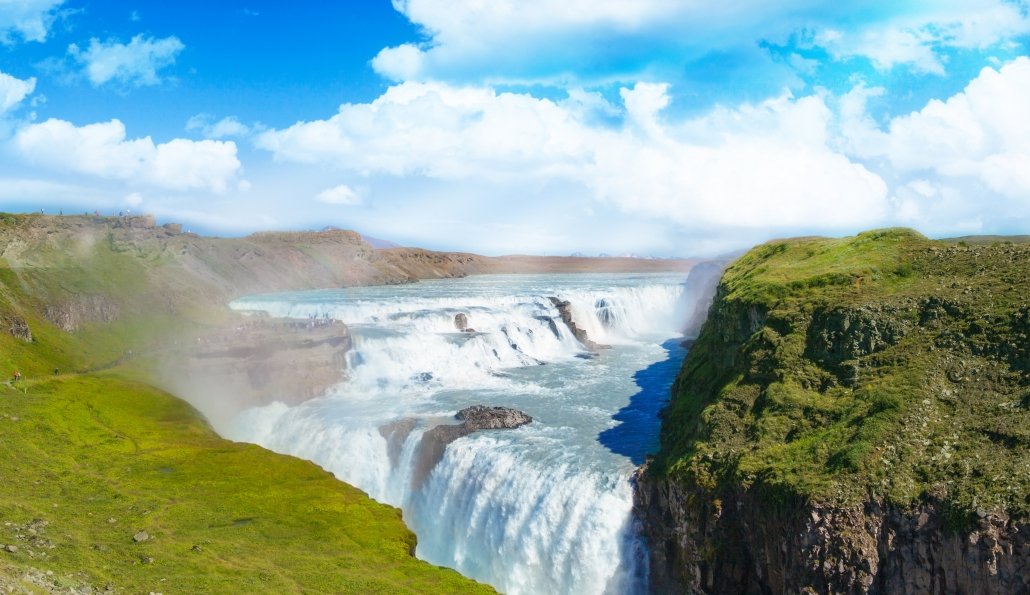
Gulfoss waterfall

If you’re wowed by water then Iceland’s numerous crashing falls are sure to impress. What’s even more thrilling is that glacial runoff is continually causing new waterfalls to form! Iceland has many striking splendours to enjoy, but some of our favourites are Gullfoss, Seljalandsfoss and Skógafoss. For those looking to venture off the beaten track, the lesser known Gluggafoss, Faxafoss, Urridafoss will hit the spot.

6.   Spend time exploring Reykjavik

Reykjavik

As the world’s most northerly capital city, artsy Reykjavik is the perfect place to take some time out to explore. Meander along the streets; taking in the colourful buildings and contrasting architecture, before looking out across the rugged hills.

Whether you join a free walking tour of the city, head up to the top of the Hallgrímskirkja for stunning city views or take a boat ride from the harbour, there’s plenty to experience in this coastal city.

7.   Behold Geysir erupting
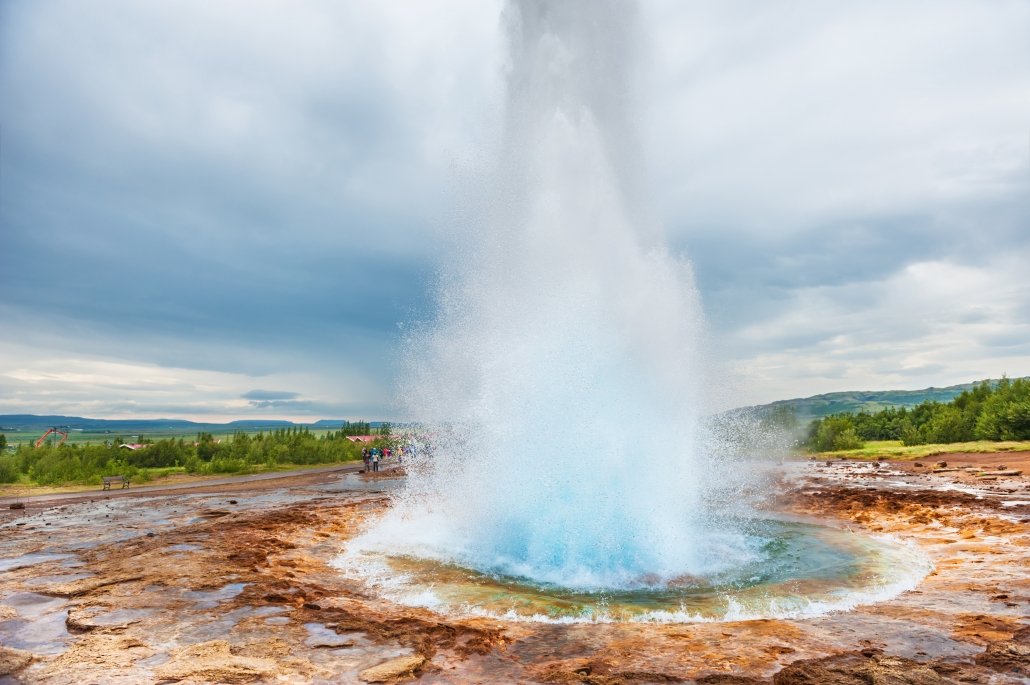
Eruption of Strokkur Geysir, Golden circle route in Iceland

As one of the visits on the Golden Circle tour, Geysir Geothermal Area is one of Iceland’s most famous tourist attractions and it’s easy to see why. No visit to Iceland would be complete without witnessing (and maybe even taking a boomerang of) Strokkur Geysir shooting boiling water tens of metres high into the air.

Home to various other hot springs, bubbling mud pools and lively eruptions, you’ll also find the original geyser, ‘Great Geysir’. Although Great Geysir’s eruptions are rare, it can eject steam up to 80 metres in the air.


8. Find out about the eruption of Eyjafjallajokull and Iceland’s other volcanoes
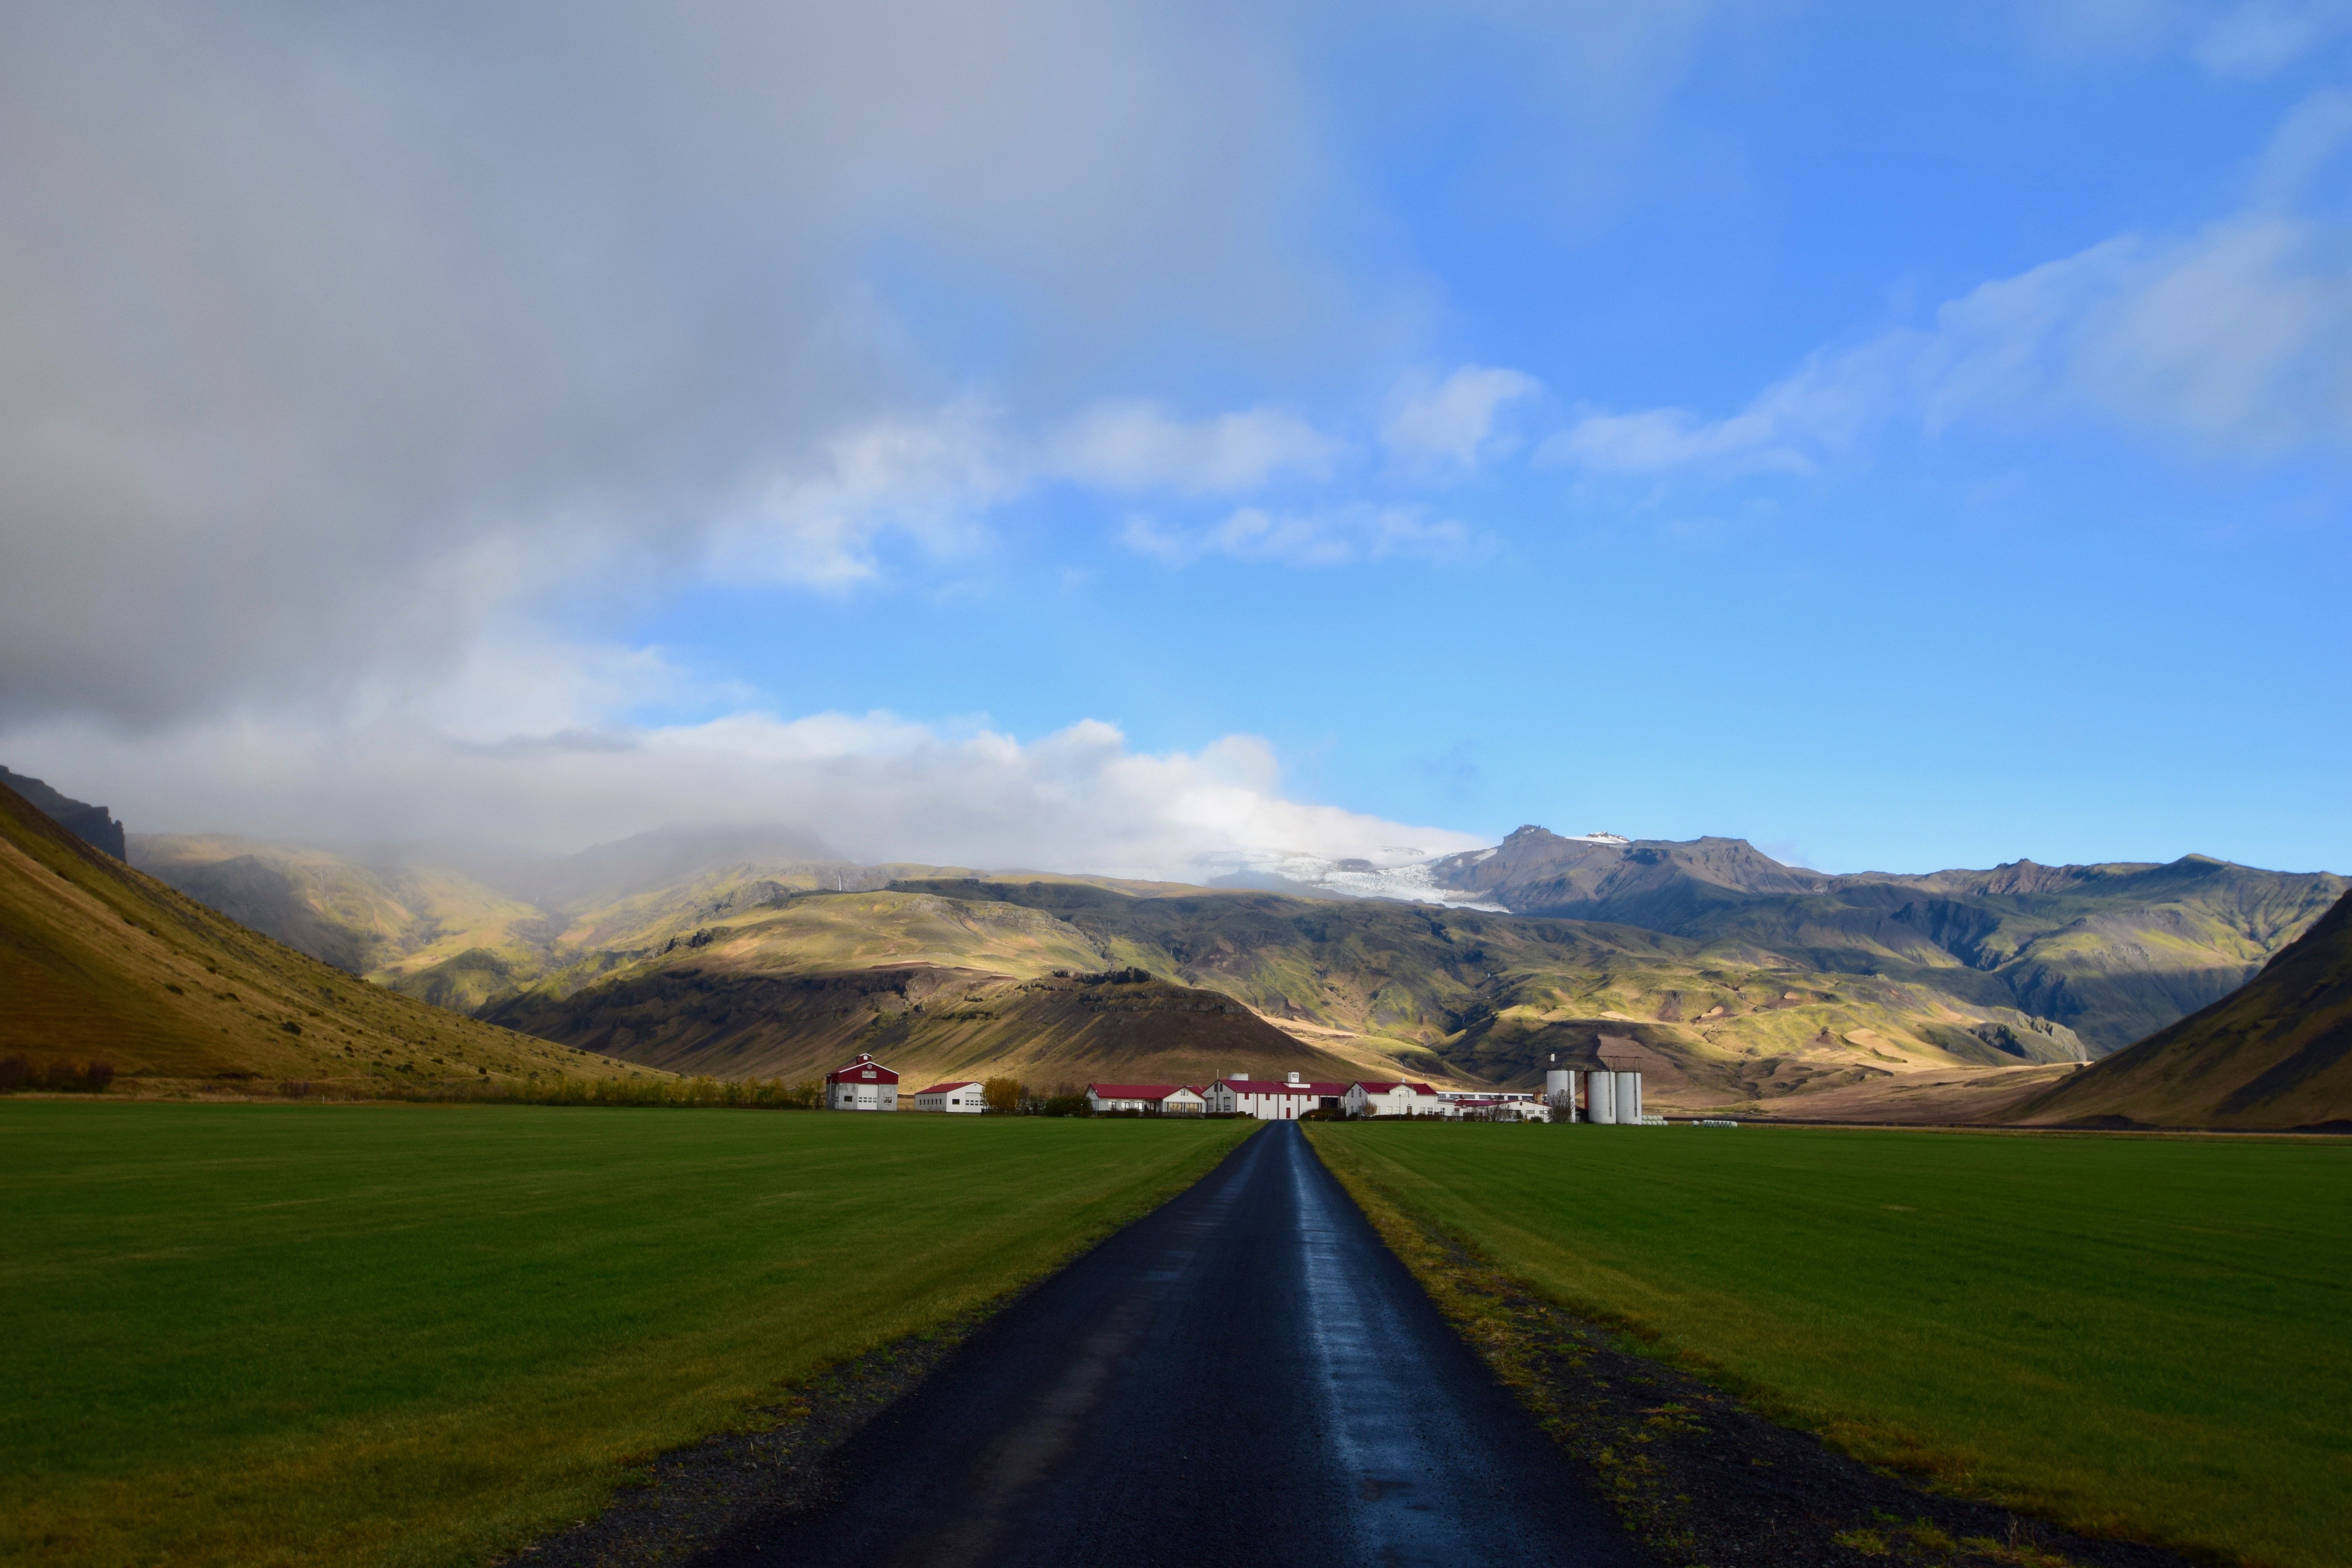
Eyjafjallajökull

Eyjafjallajökull

Iceland is well-known for its explosive volcanoes and the Katla Centre, overlooked by Eyjafjallajokull, is the perfect place to get all fired up about these explosive formations. Focusing on the Katla volcano which sits under Mýrdalsjökull glacier, you’ll examine the different types of ash and volcanic rocks and learn about the significant impact the volcanic activity has had on the area.

9. Sample some local delicacies

Showcase of different ice cream in metal tubs, closeup

Whilst visitors to Iceland may find whale and shark a little bit fishy (in every sense), there are other local favourites that are definitely worth a try. Icelanders are particularly proud of their hot dogs and ice cream – certain to get your students vote.

10. Take the ferry to Heimaey
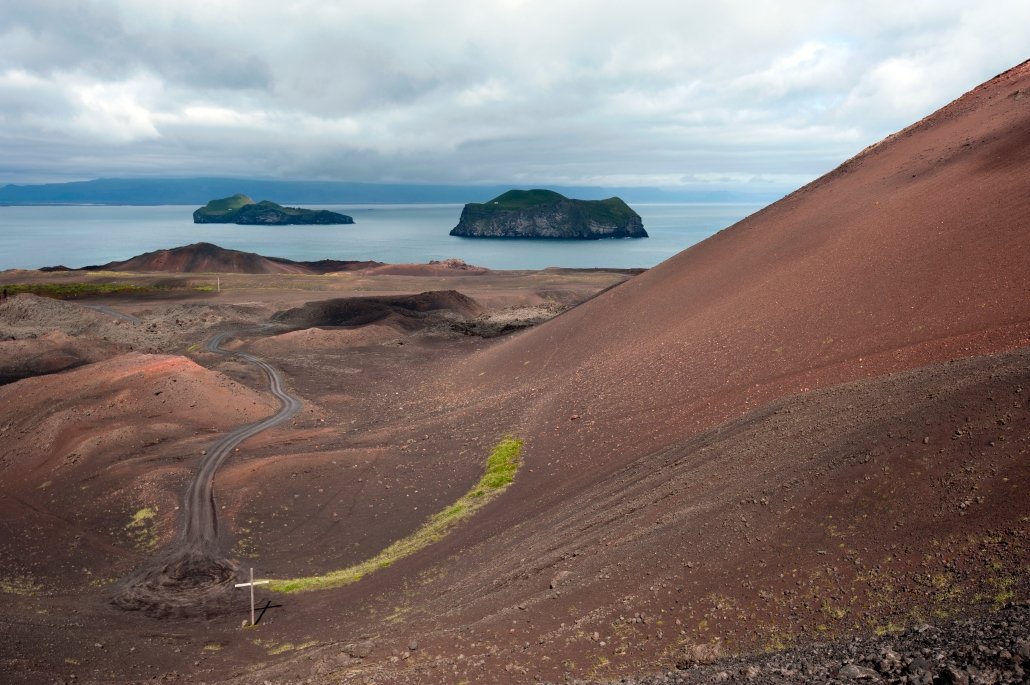
The view from Eldfell volcano on Heimaey island, Iceland

All aboard for a visit to Heimaey! The largest and only inhabited island of the Westman Isles is only a 35-minute ferry ride from mainland Iceland. Island life was transformed following a major fissure eruption in 1973, and nowadays visitors can appreciate the devestating impacts by walking across the recently formed lava fields and climbing the newly formed Eldfell volcano.
The interactive Eldheimar Museum, built around one of the homes uncovered from the ash, tells the story of the eruption and includes an exhibition on the Surtsey eruption – the island that emerged from the ocean in 1963.

Find out more about school trips to Iceland with Rayburn Tours


Measuring Air Pollution – A Simple Fieldwork Experiment

In this guest blog post Dr Paul Ganderton provides guidance on completing fieldwork involving measuring air pollution. You can follow Paul on Twitter via @ecogeog.  

Fieldwork should be frequent and compulsory! There, said it! Against the mounting paperwork and issues in my system, I stand for practical work for all students as often as possible. However, we do need to be aware of the real constraints in this endeavour. As much as we’d like to spend every lesson out in the field (and imagine how much they’d learn!), we need to allow other subjects their time. Cash is a real issue as well. I’m guessing no-one’s funding has expanded to keep pace with the cost of fieldwork equipment. This is why I’ve developed a series of field experiments that are simple, cheap and effective.

Let’s get started. These are the key factors to I bear in mind at the planning stage:

  • Validity – will the fieldwork give me decent data that can be seen (albeit in more sophisticated forms) in real geographical science?;
  • Complexity – if the work is done remotely by students, can the instructions be unambiguous so the whole class can be confident everyone’s data are comparable?;
  • Timescale – can the work be set up reasonably quickly and get decent results so students keep their enthusiasm? I like the idea of thinking fast and slow and cooking fast and slow, so why not Geography fast and slow! This one’s fast; a week’s trip gives me slow! (Both are valid but I love the quick experiment. It motivates students, gets them to realize that Geography is mostly a practical science);
  • Cost – yes, I’d love the latest monitoring equipment (please) but in the real world, you don’t get the luxury and it’s crucial all students take part.

Putting this piece of fieldwork in context of these three ideas:

  • This follows accurately the methods used in air pollution research. Today, remote sensors are used but the basic idea of gathering point data is very much alive;
  • This experiment has been road tested loads of times. I’ve never had a student fail. I even demonstrate in class first and get them to trial setting up a unit;
  • I plan this to last for about 7 days. So, students go home on holiday/half-term, set this up, forget it and bring the materials in at the start of the new term. Total student time – about 1 hour tops. About 3 lessons in class – 1 before to outline the experiment; 2 for analysis and discussion afterwards;
  • Cost – borrowing from your science department and a couple of household items means your main cost is just 1 stake per student (woodwork department scrap or hardware store). Depending on your jurisdiction, about 1GBP/$2 all up.

Moving on to the fieldwork stuff:

  • Equipment – for each student: 1 stake 1.5m high, ideally 20x20mm square; 4 microscope slides; enough sticky tape to bind top and bottom of the slide to the post; petroleum jelly to smear on each slide. For the analysis, an identification guide and microscope.
  • Method:
    • Take the stake and tape one slide to one of the faces. Make sure that only about 1cm is covered top and bottom of the slide so there’s enough space for the jelly;
    • Repeat for the other 3 faces. It’s important that the slides are all at the top of the stake. I’ve had students tape all four on at once. It’s not hard. If slides are glass, a quick warning about wearing gloves or taking care might be useful. Label each slide as N, S, E or W;
    • On the exposed glass (not tape), smear petroleum jelly on the slide. How much? More than a smear, less than a big splodge – I suppose 0.25mm – it needs to be able to withstand a week’s weather;
    • Find a spot to locate the stake. The obvious choice is in the garden, away from objects that impede air flow. Some students might live in apartments so they may have only a balcony or even just a window. No problems, just adjust as needed and use this as a case study in discussing sampling arrangements! Make sure the stake is oriented so the North-facing slide faces North etc.
    • Leave alone for about 7 days if possible;
    • At the end, take the slides carefully off the stake avoiding smudging the jelly. Transport the slides to school so that they are not smeared. I find taping them to a piece of cardboard is good. A lunch box where the slides are stuck to the bottom is excellent. Discuss with students how to transport their data without ruining it!
  • Analysis:
    • If the work has gone well, you should have 4 slides with a variety of particles embedded in them. From this point, there are two main questions – what are the particles and how many are there?;
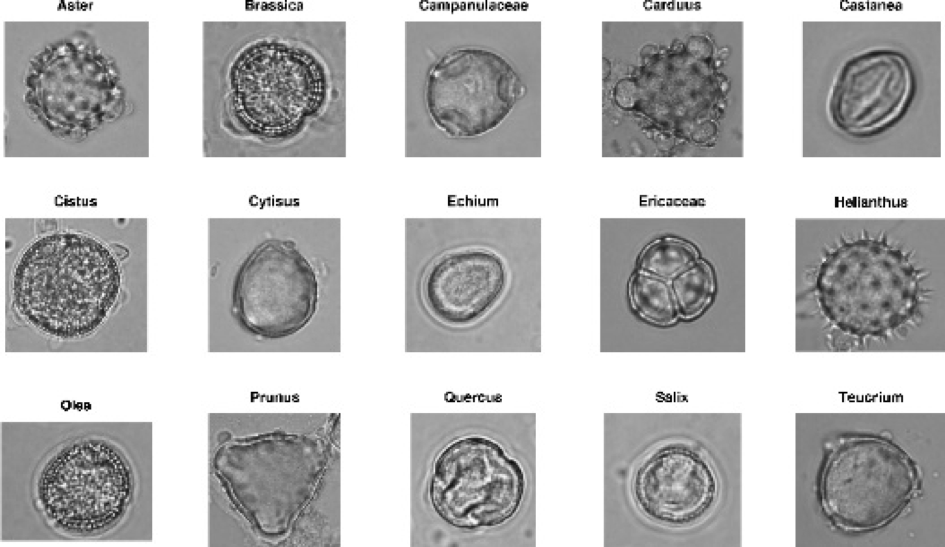
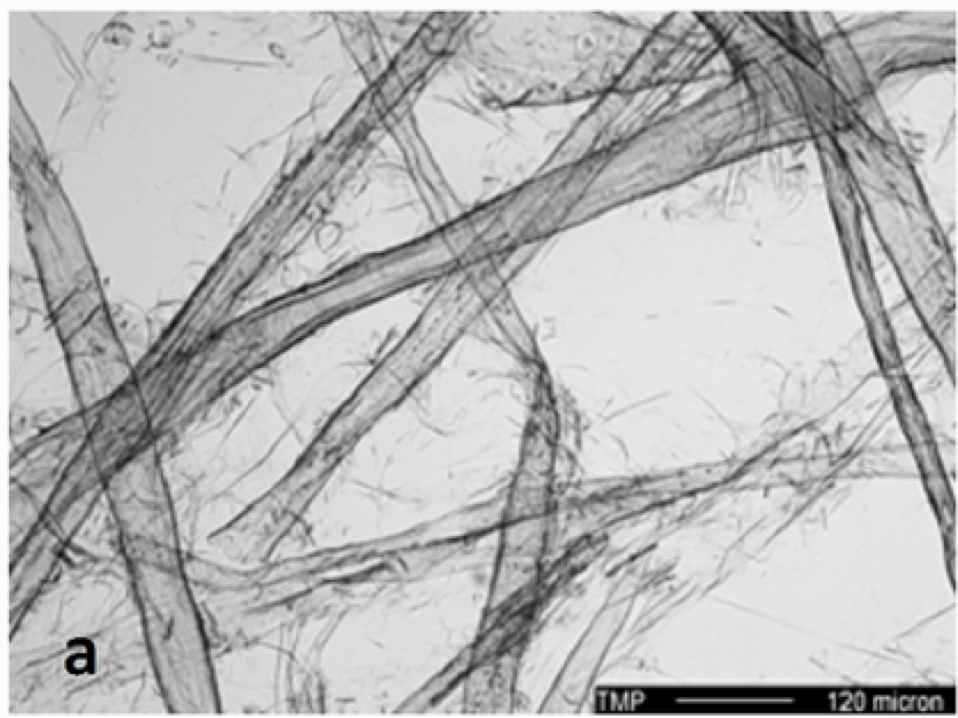
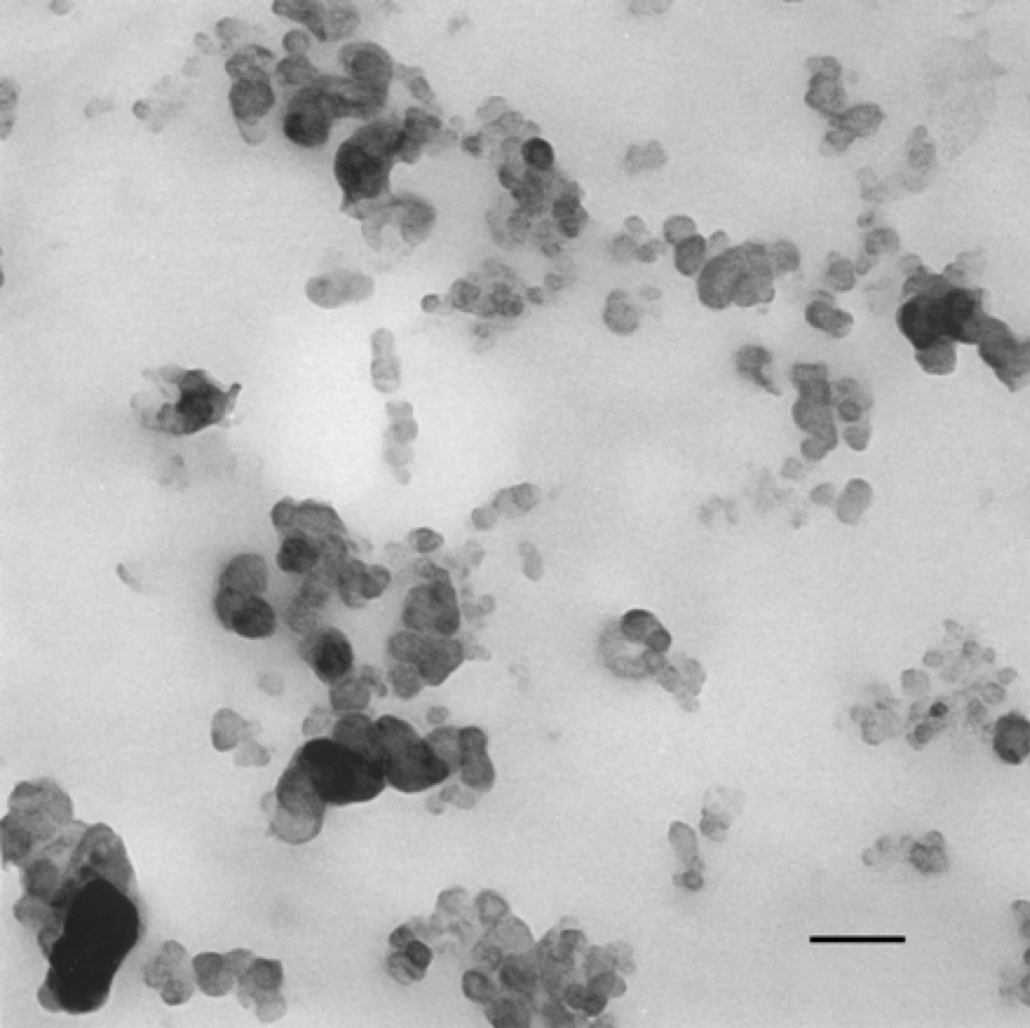
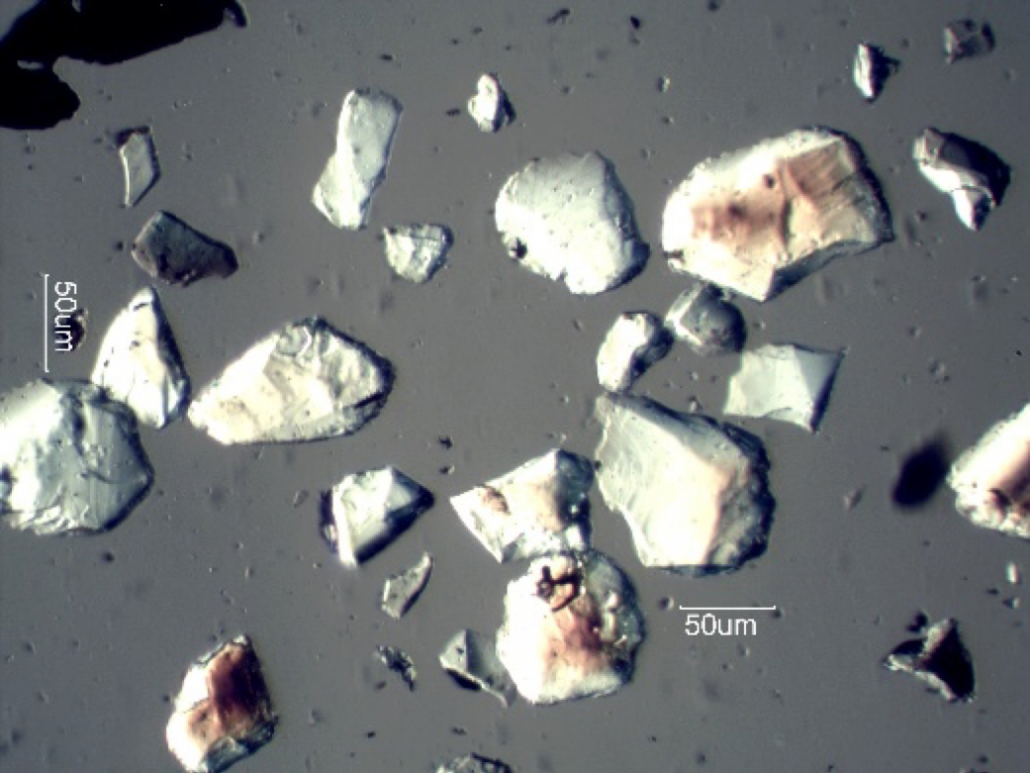
    • For the former, there are usually only 5 common particles: pollen, dust, fibres, fly ash, diesel carbon and grit. Give students an identification guide and a microscope and get them to see how many different categories of particle they can recognize(1). Put this in a table/spreadsheet;
    • For the latter, there needs to be some common system. It’s possible to count but would take far too long and be likely erroneous (bored students!). A simpler scale is the Likert-type Scale: Absent, Rare, Uncommon, Common, Abundant. Add these labels to the table/spreadsheet;
    • Take each slide in turn. Analyse the types of particles and their abundance. Put the data in the table and repeat until slides have been recorded;
    • Record the location of each stake on a map (paper or electronic).
  • Discussion:

At this stage, you should have 4 readings for each stake and a map detailing locations. This is the pattern – the whatand where. Now we get students to find out why. At this point, you can go in any number of directions which is what makes this such a good piece of fieldwork! Here are just a few of the questions I’ve posed over the years (with suggestions for answers/discussions):

  • Which direction has the most particles? (prevailing winds?)
  • Which particles are most common? (pollen, suggesting countryside or diesel carbon, suggesting roads?)
  • Are particles equally common on all sides or just some? (group of trees on one side?)
  • Do particle counts vary in one direction (distance from roads or quarries/forests etc.?)
  • Which of these particles causes most impact to (a) the environment (e.g. dust covering plants affecting photosynthesis); and (b) people (poor air quality links to asthma etc.). Get students to research this as a part of their study.
  • Taking it further:

The advantage of this work is that you can take it in a number of equally valid directions:

  • Critique of method – is it realistic and likely to give decent results?;
  • What factors might make the results less valid?;
  • What is the sampling method and how might it be improved?;
  • What pollutant factors are most important in our towns and cities? Is this research equally useful in other towns/nations? Why/why not?;
  • What can be done to reduce air pollution in our town?
  • What are the 3 key takeaway points that you have learned? Why did you choose those 3?
  • Carry out simple statistical/graphical techniques to allow comparison between sites. What pattern is shown and how can we account for it?
  • Air pollution and public health is a huge study area. Students can study the impact of exhaust fumes on health and mental development, explore the issues surrounding Lead in petrol, look at exposure to pollutants on child development etc.

There we have it. A simple yet effective fieldwork item that could be used for different years/topics. It yields itself to so much analysis and interpretation. It develops citizenship and personal health ideas through appreciating the pollution level around us. Given that a bit of promotion never hurt any subject, it can be said that this approach to a topic allows you to develop an appreciation of Geography and its potential in the real world.

Dr Paul Ganderton
@ecogeog

Footnotes

  • Particle Identification. It’s easy to make a chart from Google images as was done for this blogpost. Here are some images to help you differentiate:

Pollen:

Pollen

Dust:

Dust

Fibres:

Fibres

Fly ash:

Fly Ash

Diesel/engine particles:

Diesel/engine particle

Grit:

Grit

Becoming a UN Climate Change Accredited Teacher

Guest blogger Glynnis Morgan (@geographygem) discusses becoming a UN Climate Change Accredited Teacher.

If you are a Geography teacher on Twitter, you may have noticed over the summer holidays a spate of teachers proudly showing off certificates from various courses, and after several posts in this vain, a circular blue badge announcing themselves as a UN Climate Change Accredited Teacher.

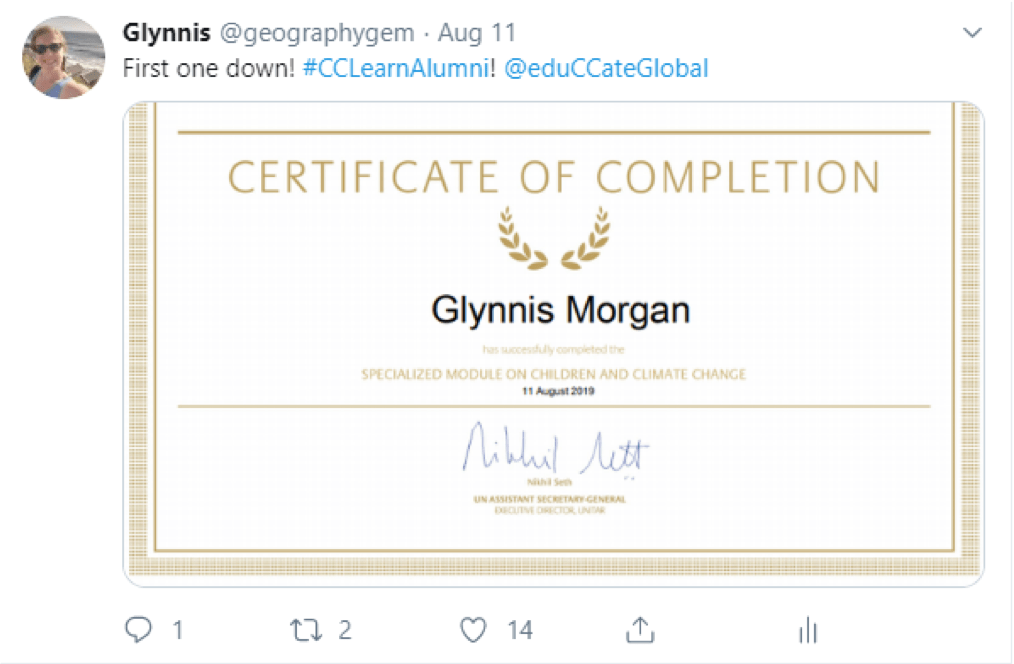
First UN Climate Change Accredited Teacher Certificate

First UN Climate Change Accredited Teacher Certificate

So what’s this all about?

The eduCCate Global Project has been organised by Harwood Education who have teamed up with the United Nations Institute for Training and Research (UNITAR) to “develop and deliver an innovative Climate Change Education Programme for primary and secondary schools in the UK” (Harwood Education 2019) Their mission is to ensure that there is a Climate Change Teacher, accredited by the UN Climate Change Learn Partnership, in every school around the world.


Once you have signed up to partake in the training, you need to work through 5 key courses and modules:

  • “Climate Change International Legal Regime”
  • “Human Health and Climate Change”
  • “Cities and Climate Change”
  • “Children and Climate Change “
  • “Open Online Course on Gender and Environment” (You only need to complete Module 1 from this course).

Each is a self-taught, self-paced course with a downloadable PowerPoint and PDF to accompany an interactive lesson. All you need to do is find a quiet place to sit down and work through them.

Being the Geography teacher stereotype I am, I armed myself with a pad of paper and my pencil case of coloured pens and highlighted and I took very colourful, highlighted notes. You don’t have to do this, but I found taking notes an easier way to take all the information need and gave me a point of reference for later use. I also set up a YouTube playlist to save all the fantastic videos in.

Once you have completed each course, advised to take around 2 hours, but I found it took longer as I made notes and viewed some of the extra supplementary material, you need to take the relevant quiz.


You get 3 attempts at the quiz, and you need to get 70% to pass. For the “Climate Change International Legal Regime” it works a little differently, there are 3 sections and each section has its own quiz, needing 60% to pass in 2 attempts. For each section, you receive a badge. Get all 3 badges, get the certificate for the module.

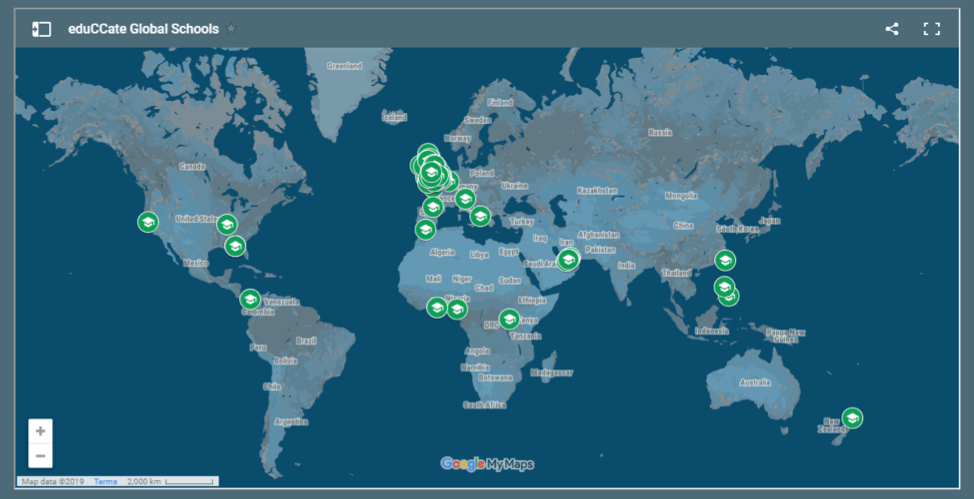
Once you have completed and passed the 5 required courses, you receive the final badge and become a UN Climate Change Accredited teacher. You then need to register this with eduCCate Global who will then add you to the world map of Climate Change Teachers.

UN Climate Change Accredited Teachers Map

UN Climate Change Accredited Teachers Map

But what’s the point in doing this?

Yes, it appeals to the competitive spirit in us, wanting to complete the courses and make an announcement that we too now have this accreditation. And of course, as professionals, we should be striving for further development of our subject knowledge for our own (and our students’) betterment.

But the main point of doing this is because climate change is the biggest social, economic, political and environmental concern of our time. Nothing else threatens our every day and our future as much as climate change and it impacts, and we need to be informed.

Back in March 2019, 4 students from a school in Oxford campaigned for better teaching on Climate Change. They launched a petition, which reached more than 50,000 signatures, stating that pupils need to be taught more about the impact of climate change. In response, the government said that the subject of climate change is already covered in science and geography (BBC 2019)

The Government’s response is correct. The Geography Curriculum refers to climate change, not only in its own individual topic of causes, impacts and responses but in many others as well, migration, energy security, food and water security, ecosystems, urbanisation and globalisation to name a few.

This qualification will add another string to many Geography teachers’ bows, and as the eduCCate Global website says, “transform knowledge into positive action”.

By providing relevant and up-to-date information on climate change, Geography teachers can make their lessons more informed than ever before. We can provide our students with the knowledge they need to help combat the impacts of climate change and lead a fundamental shift in the way we use and consume resources, travel, and treat the planet.

So if you are interested, you have until September 30th2019 to complete the courses before Phase 1 comes to an end.

Those of us signed up and accredited move into Phase 2 are excited and ready to take part!

Sign up here: https://educcateglobal.org/index.html

Glynnis Morgan
Head of Geography, south west London

@geographygem

Links:

BBC (2019) https://www.bbc.co.uk/news/av/uk-england-oxfordshire-47709552/climate-change-petition-oxford-students-campaign-for-better-teaching-on-subject

Harwood Education https://harwoodeducation.com/un-cclearn/

Narratives in geography

Guest blogger Alison Schofield (@alisongeog) discusses how using narratives in geography lessons has supported GCSE improvements.

I have been teaching geography now for over 20 years and I love the geography community that exists in social media who are always sharing their ideas and resources so I thought I would share how I have used narratives in my teaching at GCSE as one technique.

All my GCSE groups are taught in mixed ability with target ranges from 1-9 which does hold challenges when trying to incorporate knowledge and understanding of the places and concepts we teach. It became apparent to me that the way my department and I were teaching was not working for all and I had to go back to the drawing board.


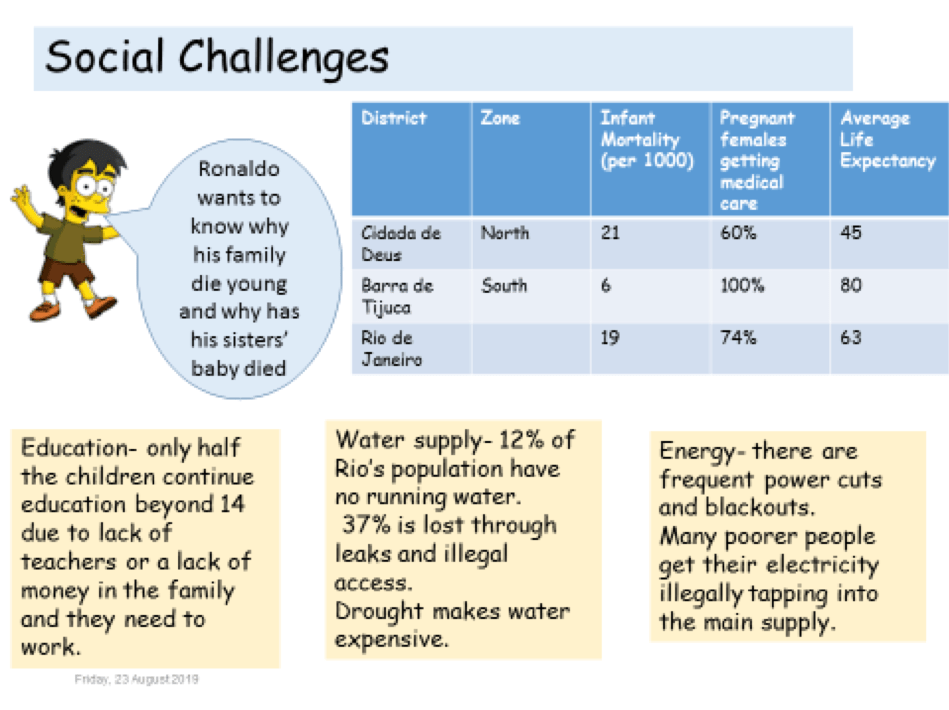
I decided that I would focus on one topic and create a story about a boy who lives in the Favelas in Rio. I used a Simpson’s character who lives in Brazil and used him to tell the story of his life and those around him. We investigated why he lived there, what his life was like and why. Below is one of the slides I used.

Narratives in geography

Narratives in geography – example 1

By using him to tell a story every single lesson the knowledge and understanding started to stick. Answers were given verbally and in written format actually stared to reference the case study. Students who struggled to get 1 mark in a 9 mark question retold the story enabling higher achievements. More importantly, it made the teaching and learning fun again, something that had been somewhat missing after the new specification changes.

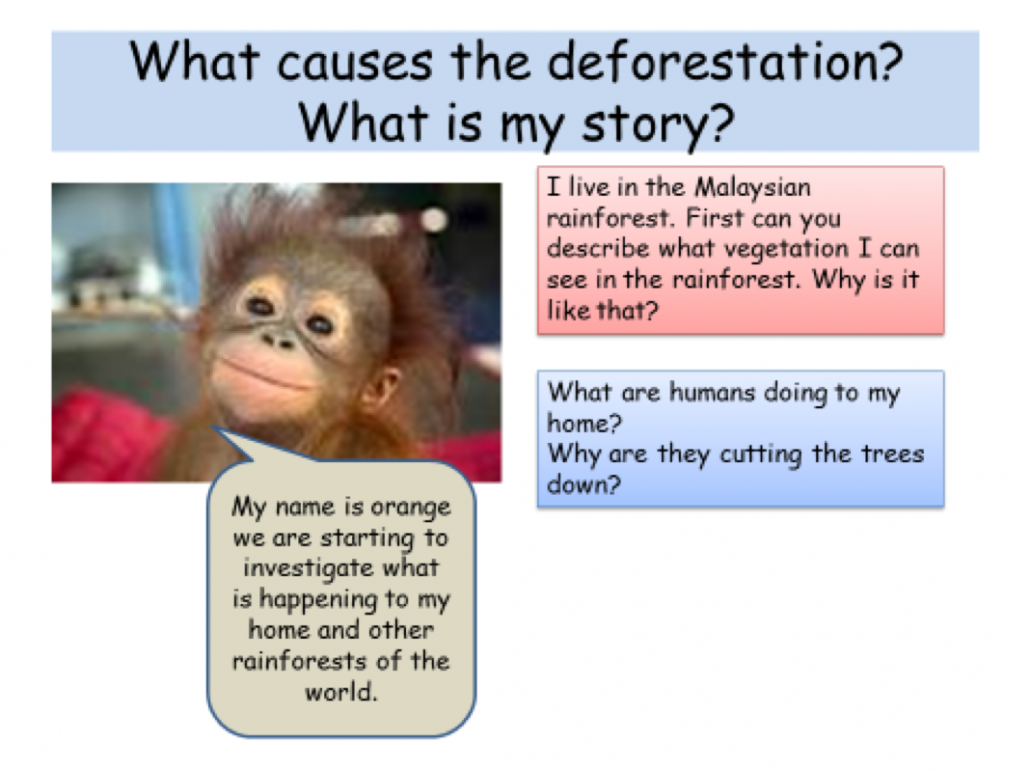
Below is another example I have used.

Narratives in geography example 2

Narratives in geography – example 2

I am happy to say that making little changes like these have meant that my department has seen an increase of nearly 20% in attainment from last year’s GCSE results, so I will continue with my storytelling.


Alison Schofield
@alisongeog

August 2019

Internet Geography is offering a platform for guest bloggers for this academic year. Got a teaching strategy, interest or anything geographical you’d like to share? Please contact us. We’re unable to offer a financial award but we’ll send you a little treat in the post.

Elaboration, elaboration, elaboration…

We’re really pleased that guest blogger, Abdurrahman Pérez (@mr_perez5), is back discussing his strategies for encouraging students to develop their answers to geographical questions further. 

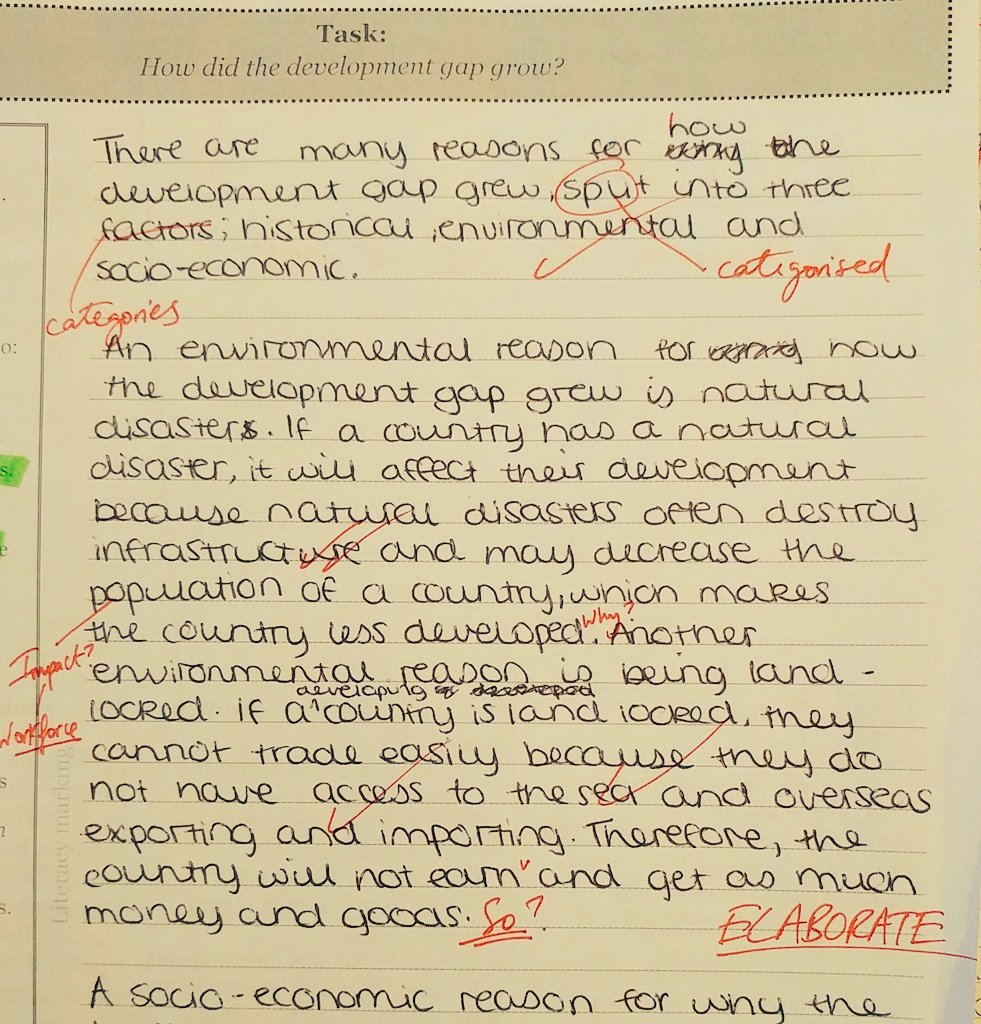
My biggest takeaway having finished my second year in the classroom was how often I was finding students were leaving arguments/points half-done, undeveloped and leaving me asking “so?”, “and?” or “why?”. I was writing these three questions on student work so often I thought I had to do something about it. So much was it a worry for me that when I finally put up the display on it (which I’ll get back to later), I began every lesson introducing it, telling all my classes where the display was, why I had made it and how they could use it. My thoughts on being honest with pupils are perhaps for another time, but I cannot overstate its importance – why let them be mind-readers? Tell them what you want from, why you do what you, why you’re approaching a lesson a certain way, etc… Anyway, that’s for another time!


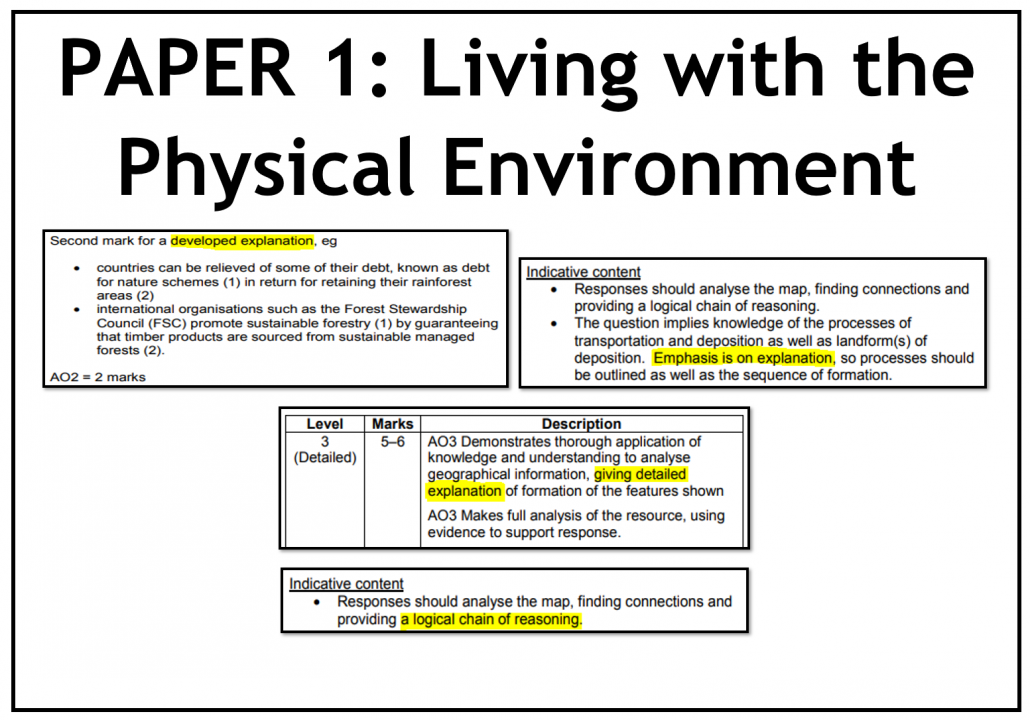
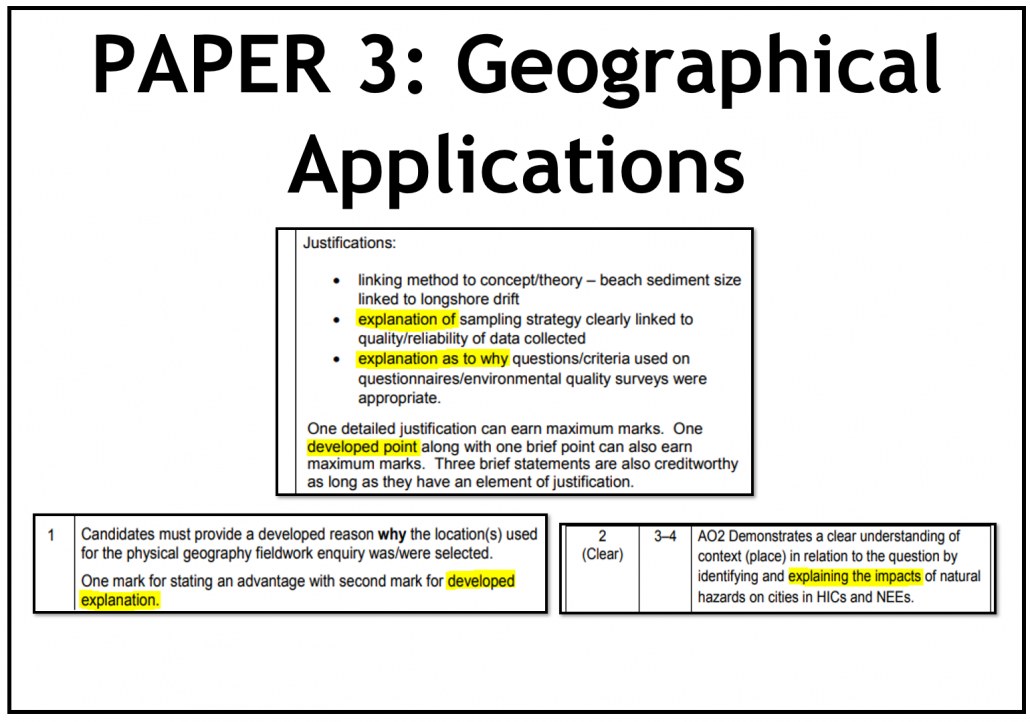
The AQA mark schemes want “developed” responses, so does Edexcel (as well as “logical connections”) and Eduqas call them “chains of reasoning”, a much better way of thinking about it, but my thoughts on why Eduqas is infinitely better than AQA and all the rest deserve a whole book, so I’ll leave it there!). Below you can see some AQA examples, which I decided to keep out of the final display as they are unnecessary and made it far less student-friendly. The urge to address this was further compounded when I recalled some of my Year 11s scripts from the summer exams and noticed how ‘highly-rated’ the approach of elaborating and explaining themselves my pupils had used to good effect was. (This would later be confirmed when I did some exam marking over the summer and noticed how successful candidates who properly developed their answers were.

Paper 1 Living with the physical environment

Paper 1 Living with the physical environment

Paper 3 Geographical Applications

Paper 3 Geographical Applications

In my department, we start everything from KS3, not in the exam-factory sense, but more in a bid to get the right skills embedded by the time students get to Year 10 when we start our two-year GCSE. This means I wanted everyone to be elaborating and developing their points, from 7 set 5 to my Year 13s. In my opinion, this approach is totally applicable to all ages and abilities – in fact, my explanation of the display was no different with 17-year-olds than it was with 12-year-olds…


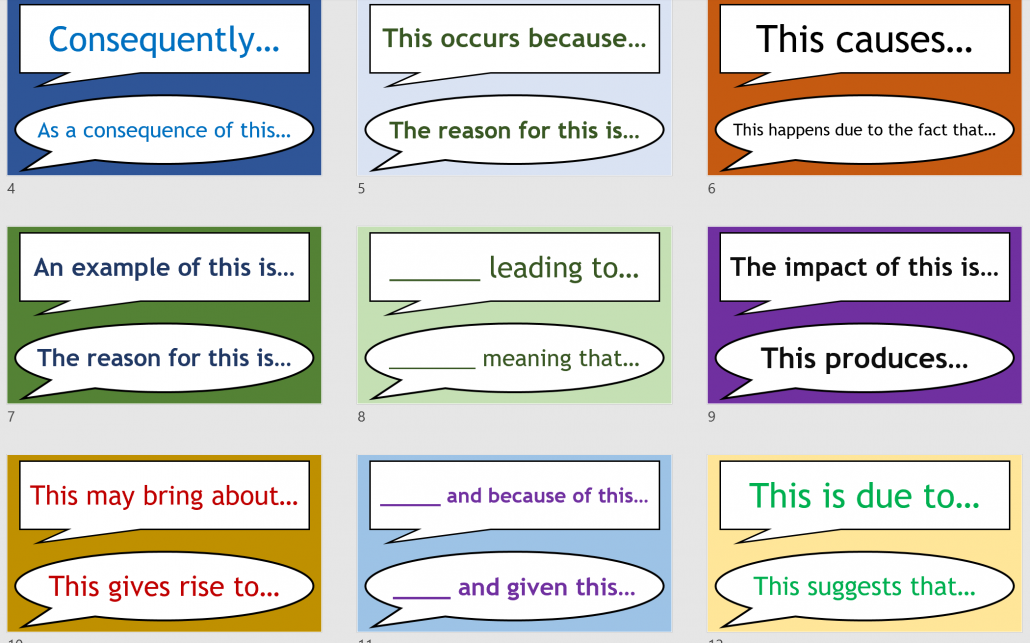
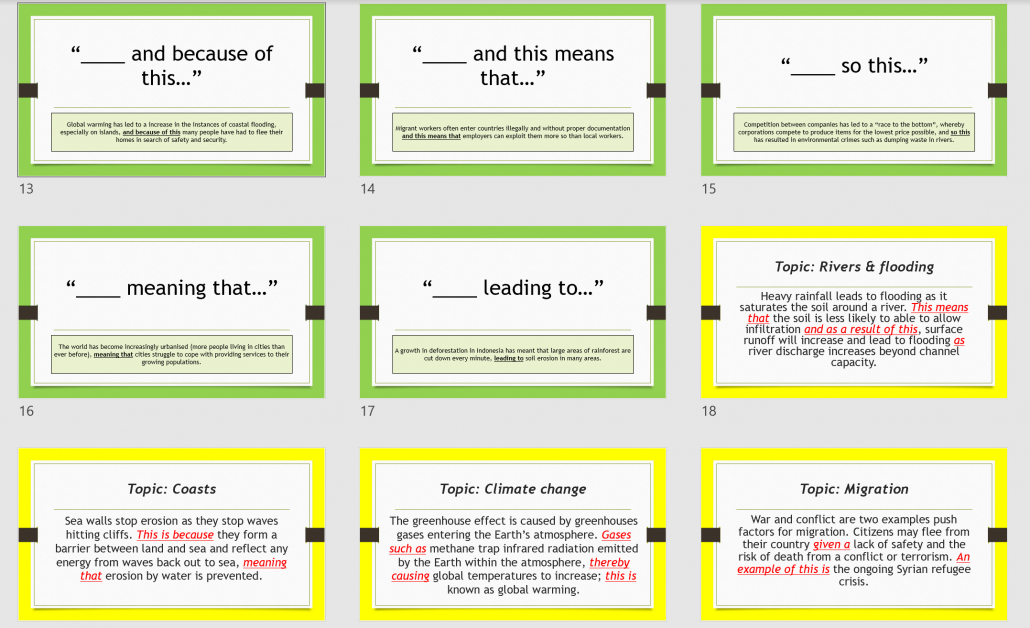
I call it “don’t put them full stop too early” – I want my pupils to elaborate on their evidence, explain their arguments or develop their points. This concept is at the heart of acronyms such as PEEL, PEDaL, etc, so chances are you are aiming for it too. I don’t want: “heavy rainfall leads to flooding as it saturates the soil around a river” – I want “heavy rainfall leads to flooding as it saturates the soil around a river. This means that the soil is less likely to able to allow infiltration and as a result of this, surface runoff will increase and lead to flooding as river discharge increases beyond channel capacity.” Yes, the sentence is longer but now I know that the pupil knows their stuff and I expect this from Year 7s, mind. I tell my pupils that I know and trust they know their stuff (most of them at least!), they just need to prove it because I won’t assume anything when I’m marking their work or questioning them in class; for the older ones, I tell them to prove it to an examiner who has never met them. To help them do this, my pupils are presented with a number of stems.

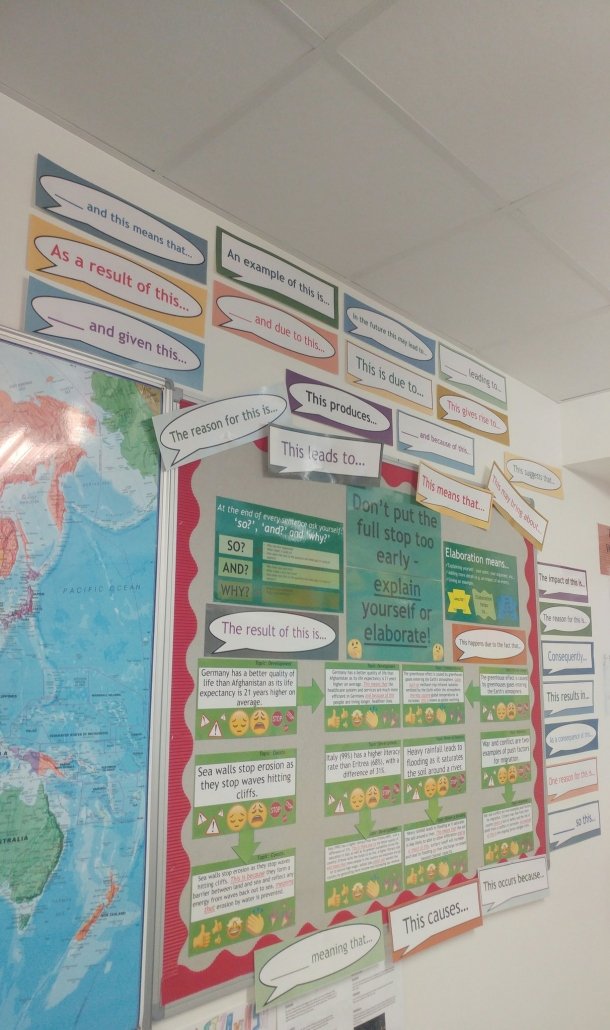
Wall display to support elaboration

Wall display to support elaboration


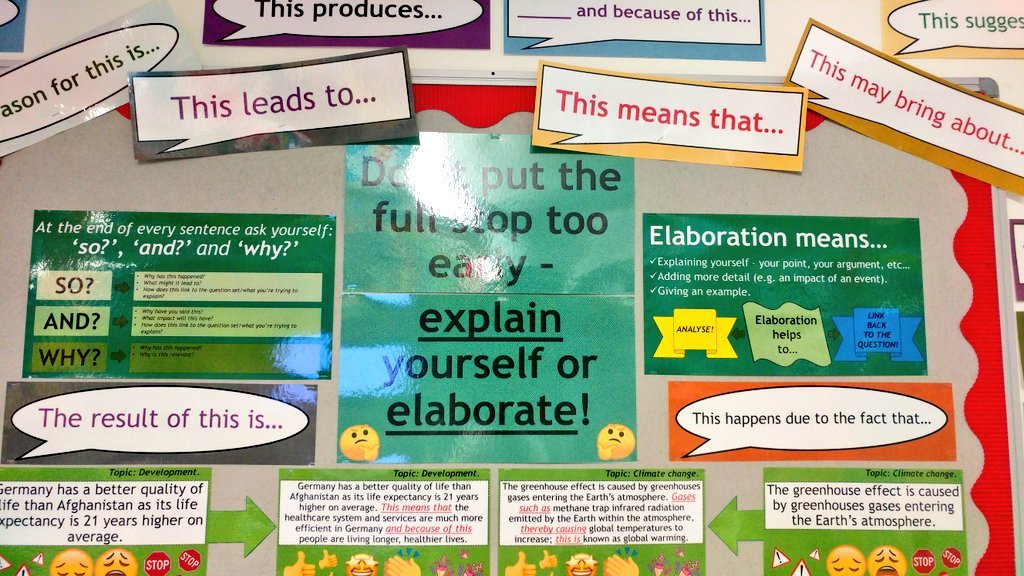
Explain yourself or elaborate

Explain yourself or elaborate

Writing cues

Writing cues

The display:

I am not interested in wading into the whole “what is the point of displays?” ‘debate’ that has cropped up on Twitter an annoying amount of times. Am I covering exactly 44.56% of my walls? I don’t know. Am I complying with fire-safety rules? I’m not sure…(?). Am I distracting pupils? I sure hope not…

What matters is that this display works with for me and I use it very often for the benefit of my pupils. That is all that does and will ever matter in the display debate. I am often directing students to its use and I encourage students to look at it whilst completing in-class extended writing (we call them Big Writes) and I even get them to use them whilst stretching their verbal responses to my question. For example, if a pupil has given me an answer and I want more from them, I will challenge them to turn around and use one of the stems to extend their answer. Or I might get another pupil to do this for them.

This led to some good results here and there – this year 9 pupil you can see is in the process of grasping it:

Example of response

Example of response

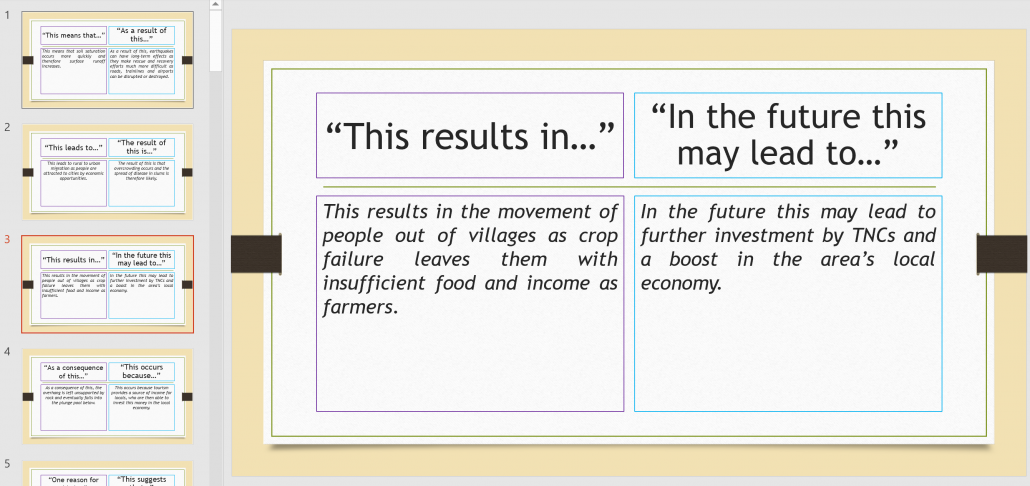
However, this is still a developing approach and is by no means embedded. I need to model it for pupils more often and maybe even the fact that the display is at the back of my class makes its use impractical. This is partly the reason why I have created laminated cards. Inspired by @missgeog92, these will be placed into the boxes I have on my desks which currently house the glues, scissors and dictionary, held together using some cheap binding rings from Amazon.

And this means that

And this means that…

This results in

This results in

Writing cues and examples

Writing cues and examples

What matters really is how much I push them. I, and you if you decide to use them, cannot just hope pupils will diligently pick them up during a lesson and just use them. After all, how many of them use those nice laminated matts you put out every so often? Pupils need training and modelling, so that’s my task in September. Hopefully, if I do it often enough it’ll stick! It’s easy to want rapid results but you and I know that’s not how teaching works – it’s not how children (and their brains) work! To ‘convince’ them I have often used lots of written and verbal examples, I praise its use pupils and I often refer to the actual display in lessons, getting the whole class to turn and face it – much to the chagrin of moody teenagers! However, what I think really struck a chord with some – and to return to my point of being honest with students – is when I explained why they should use the display.


I told/tell them elaboration can mean: (1) explaining yourself – your point or your argument; (2) adding more detail (e.g. an impact of an event) or (3) giving an example. I tell them it can help to analyse (the A-Level lot love this) or a way to link back to the question (and the GCSE classes lap this up!). I ask them to ask themselves the very same questions I am left asking when I’ve read their work: So? And? Why? That’s when a lot of them ‘get it’.

I think we’re all trying to do this in some sort way – in fact, I initially thought this might be a good blog post because I saw @Geoisamazing’s brilliant “This means that…” resource recently on Twitter and it reminded me of what I had done/was planning to do. It is definitely a case of ‘slowly, slowly catchy monkey’ (very slowly with some pupils or classes), but it’s certainly worth sticking with. You’ll notice differences in oral responses as well written answers in time and that will mean you will have equipped your pupils with the tools to produce work you – but more importantly, they – can be very proud of!

Abdurrahman Pérez (@mr_perez5)
August 2019

You can find the elaboration display here and I will post the laminated ring cards on my Twitter account when they’re finished: https://drive.google.com/drive/folders/1_ufOduWmtrdd-zxwKw3RBWg-DimRU4CL?usp=sharing

Internet Geography is offering a platform for guest bloggers for this academic year. Got a teaching strategy, interest or anything geographical you’d like to share? Please contact us. We’re unable to offer a financial award but we’ll send you a little treat in the post.

A technique for graph interpretation exam questions using TEA

Guest blogger Adam McAllister (@McAllister_Geog), geography teacher of two years, shares a strategy for interpreting graphs. 

Despite my young years, it was clear that when working with data and graphs in lessons, children struggled with interpretation. Both children in key stage 3 and those studying GCSE struggled with graph interpretation. As a result, I started to use and embed TEA (trend, example, and anomaly). A simple but effective strategy. However, was it as simple as I first thought?

Well, the answer was perhaps not. Trying to embed new strategies with children can be rather challenging as I found out! It is all about routine, routine, routine. Children have to be trained to do the things that we expect. It is just like riding a bike. You have to learn/be taught first before removing the stabilisers – and much confidence!


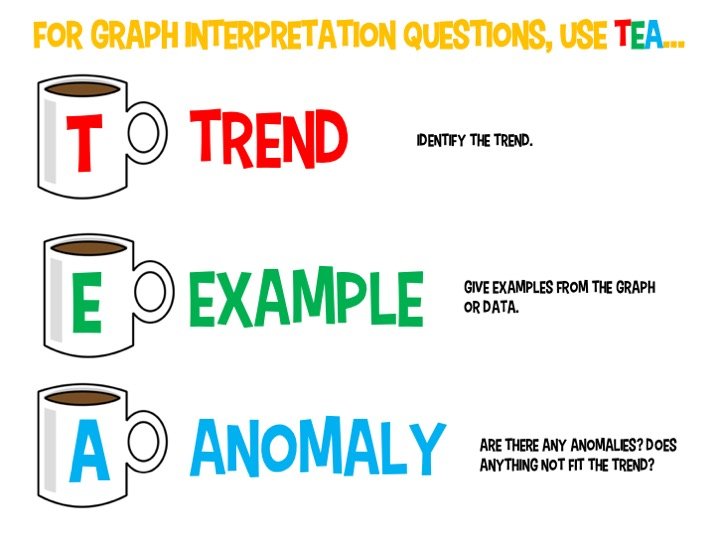
T stands for trend. Children need to look for a trend or pattern in a data set or graph. There must be a trend to identify, otherwise, the exam question would be rather pointless in my eyes. Trends that I would ask children to look for would be the basic increase/decrease for one, but whether the data/graph fluctuates. Other things that I would ‘train’ them to look for would be whether the rate of decrease and/or increase is rapid, slow, constant.

E stands for example. At this stage of TEA, I would ask children to look for an example or evidence that backs up the first initial point that have identified. Whether this is quoting the rate of increase, the years at which there is a decrease. It is also vitally important to embed that if a graph or data figure has a specific unit, this should also be quoted in any given answer.


A stands for anomaly. This one may be a little trickier. At times there may not be an anomaly. It is okay that we and the children we teach accept this. If an anomaly is identified, this needs to be placed into the answer. Examples would include a decrease/increase or significant change in the data or figure. An anomaly could be as simple as something that does not fit the trend you earlier identified! Again, this should be supported with an example or evidence.

TEA Graphs in Geography

TEA Graphs in Geography

Working on this strategy at my current school has seen improvement of answers given, in relation to data and graph interpretation questions. It is still a work in progress currently, but I am delighted with the strides taken forward!

Adam McAllister
August 2019

Click to download resources

Internet Geography is offering a platform for guest bloggers for this academic year. Got a teaching strategy, interest or anything geographical you’d like to share? Please contact us. We’re unable to offer a financial award but we’ll send you a little treat in the post.

Close Encounters of the Geographical Kind

Guest blogger Brendan Conway (@mildthing99) shares his light-hearted take on the geographer’s curse, or blessing, of not being able to switch off during the holidays. 

Each year during the summer break, one geography colleague after another confesses an inability to switch off their professional brain. Perhaps this is the way it should be? So immersed are we in our subject that when the holidays arrive, it’s probably unreasonable, undesirable and impossible to expect that we’ll suddenly stop seeing the special geographical things that other people don’t.

The way that a geographer’s senses are attuned to the environment is a bit like an infrared camera at night. Invisible to most, our sensitivities are keenly alert to the geographical radiation oozing from the most commonplace artefacts, events, people or places.


Recently, Aqeeb Akram @mrgeogaa shared this tongue-in-cheek Tweet, inspiring several sympathetic responses from geographers.

The phenomenon was captured superbly by Megan @geography_meg in this Tweet from 2017:

Occasionally (or even quite often), the ‘inner Attenborough’ can take over as we feel the irresistible urge to explain phenomena to anyone prepared (or even unprepared) to listen.

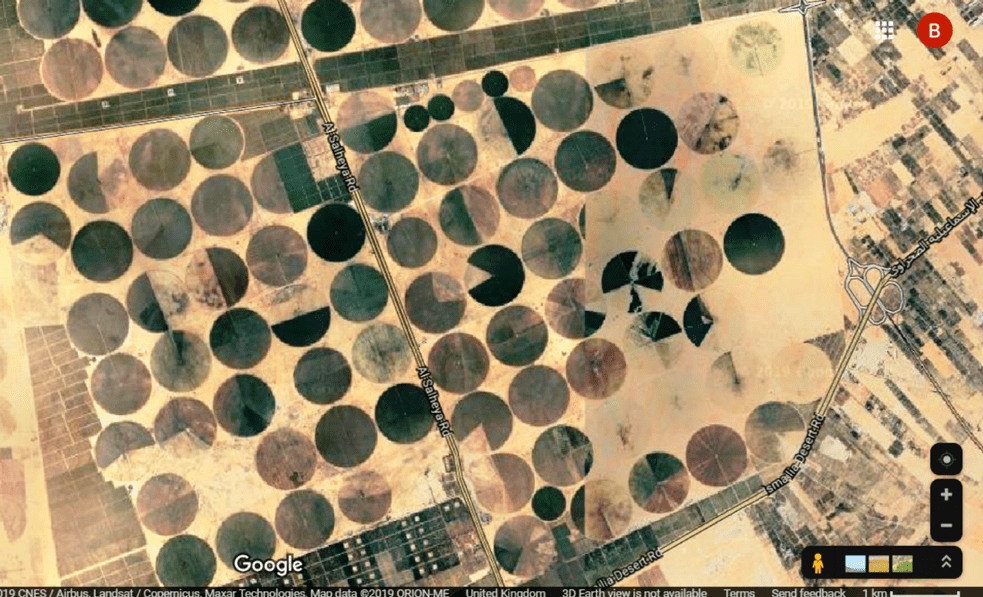
During a flight over Egypt a couple of years ago, a couple of fellow passengers in the neighbouring seats spotted clusters of weird dots in the desert below. They speculated that they might be some kind of secret military base or something to do with the Ancient Egyptians. I had a look and was able to reassure them that it was a centre-pivot irrigation scheme, which creates circular fields thereby ‘greening’ the desert; this is what’s known as an agricultural ‘tech fix’…

… then the drinks trolley arrived.

A centre-pivot irrigation scheme

A centre-pivot irrigation scheme

The audience may not always be so proactive. On another holiday in Zimbabwe when visiting Victoria Falls, my non-geographical friends became highly preoccupied with the majesty of it all. Fortunately for them, I was able to enrich their experience (whether they liked it or not) with talk of fluvial erosion, rejuvenation and (for those still listening) endorheic lakes.  ‘Thanks – I think I’ll just sit here and marvel at it’ one of them said.

At times like this, a scene from the movie Close Encounters of The Third Kind comes to mind. Following his ‘close encounter’, the central character Roy Neary (played by Richard Dreyfuss) is sitting with his family at mealtime and can’t stop visualising, then carving a distinctive mountain with his mashed potatoes. His wife and kids watch him with incredulity and not a little despair. Later on, he creates even more impressive models of the mountain elsewhere in the house.


So far, so good. However, in the story, the mysterious landform represents his calling to a special place where he will be voluntarily spirited away by benign aliens. However, as any geographer will tell you, he does slightly miss the point, because nobody tells him that the mountain is, in fact, Devil’s Tower Wyoming, a spectacular igneous intrusion or volcanic plug which has been revealed by millions of years of differential erosion and sub-aerial processes. I know this having once driven all night to enjoy watching the sunrise over it without any extra-terrestrial assistance.

Although geographers might at first appear to be pouring cold water on fires of enthusiasm with their seemingly prosaic explanations, we are in fact proffering far more promising avenues of awe and wonder. So let’s not worry about the fact that our geographical engines have been purring away in the background for the whole of the holiday, like the data projector we forgot to switch off on the last day of term. Those thinly-veiled field trips you might have called holidays will sustain an endless supply of anecdotage back in the classroom well into the future.

Brendan Conway
@mildthing99
August 2019

Internet Geography is offering a platform for guest bloggers for this academic year. Got a teaching strategy, interest or anything geographical you’d like to share? Please contact us. We’re unable to offer a financial award but we’ll send you a little treat in the post.

Does the GCSE Geography Curriculum need further modernisation?

Guest blogger James Pledger (@JamesPledger) argues the need for further modernisation of the GCSE Geography Curriculum. 

Two months ago, I spoke to Mohammed in his small shipping container, a part of the Katsikas refugee camp in Northern Greece. We were chatting about causes of the Syrian civil war that had forced him to flee his home in Homs and make the dangerous trip across the Aegean Sea. Following the conversation, on top of realising how utterly desperate the situation in Syria was, it occurred to me how inextricably linked to ‘geography’ the outbreak and continuation of this war were. From the drought in Syria from 2009-2011 (widely viewed as a result of climate change) that caused high rural-urban migration; to global geopolitics, population increases, globalisation, divides between young and old that manifested in the Arab Spring, as well as the introduction of social media/improved technology, it is clear that there were a huge amount of modern geographical factors at play. This got me thinking, surely it is time to modernise the GCSE curriculum further to reflect more of the issues mentioned here?


This is not to say that there have not been significant improvements in the most recent specifications from all exam boards. The environment generally receives a good deal of attention from the majority of the exam boards; there is always some mention of global ecosystems and the mechanisms of globalisation are also touched on by the three main examining bodies. However, let us go further. There are several changes which seem sensible for the geography curriculum to reflect our world in 2019.

1.) The UN categorises anthropogenic climate change as the ‘defining issue of our time’. Therefore, there should be 2/6 of the geography GCSE curriculum dedicated to it. Also, phrases such as ‘there are a number of possible causes of climate change’ preceding lessons on the natural causes of climate change should be avoided; this surely does not give an accurate impression of the situation to students. It provides the kind of ‘balanced’ argument that Nigel Lawson used to when appearing on BBC Breakfast next to a climate scientist.

2.) ‘Development and progress’ should also make up at least 1/6 of each course, but be taught slightly differently. I would use Hans Rosling’s research from the GapMinder Institute to highlight the extent of human progress over the last 100 years, avoiding the traditional Global North/South fallacy and using case studies such as the Bill and Melinda Gates Foundation, in addition to traditional case studies which generally show LIC countries being exploited by TNCs.


3.) ‘Geopolitics’ should make up 1/6 of each course. This is a topic reflected in university and A-Level Geography courses but completely avoided at GCSE. Is this due to an assumption that the students will not understand, as it is an increasingly important part of geography? In the future, water, food and energy tensions will be played out geopolitically; there seems to be a great chance being missed here to make synoptic links.

4.) Globalisation and technology must be included in the specifications, again making up 1/6 of the course. Social media, automation, anti-biotic immunity, rural-urban migration; almost all of the issues that contributed to the civil war in Syria and Mohammed ending up in Greece should be touched upon within GCSE Geography in my opinion. If we do not as geographers, where else will students be getting this type of information from?

Clearly, all the changes laid out above leave only 1/6 of ‘free’ space to teach anything else! In all the current specifications, there is an adequate section on the biosphere and global ecosystems, which I believe should stay. That means that the specification is full and that in fact, what is being suggested here, is an alternative GCSE curriculum, based on the geographical challenges that will face our students when they leave the classroom.

I know that geography purists won’t like these suggestions. I fully appreciate the value of learning about tectonic plates, earthquakes and volcanoes. I understand how teaching about natural processes like meanders can be interesting and provide local knowledge. I know that the UK has been largely omitted from my suggested specification.


Currently, UK geography makes up a good portion of all the specification content across exam boards, and I know that much of that will be lost. But there is no other subject that is equipped to teach these increasingly important issues. I would argue that an awareness of the impacts of climate change, of the effects of social media on populations and of massively improved global health is much more important to equip our students with than knowledge of meanders or types of erosion. GCSE Geography should look to the future, to plan for the present.

James Pledger
@JamesPledger

What’s your view on the proposal made by James? Feel free to leave a comment below. We’re keen to encourage debate on Internet Geography, just remember to keep it polite! 

Internet Geography is offering a platform for guest bloggers for this academic year. Got a teaching strategy, interest or anything geographical you’d like to share? Please contact us. We’re unable to offer a financial award but we’ll send you a little treat in the post.

Increasing ‘word consciousness’ in the geography classroom

Guest blogger Abdurrahman Pérez (@mr_perez5) discusses his strategies for increasing ‘word consciousness’ in the geography classroom.

What struck me the most while reading Alex Quigley’s (@HuntingEnglish) fantastic ‘Closing the Vocabulary Gap’ (aside from the inspiring reminder of the duty we have to disadvantaged children to better their vocabulary) was the focus on explicit vocabulary teaching. He wants us to make our pupils more ‘word conscious’, and in Episode 13 of ‘The Staffroom’ podcast, he described words as possessing “layers of meaning” and teachers needing to be explicit with students about these when helping them understand specific vocabulary.


Simply put, we cannot just expect them to know, retain and use words magically. We cannot assume. We cannot leave it to anyone else. If you want your pupils to confidently breakdown dense texts, write superb answers to increasingly complex exam questions or to generally be able to understand, analyse and cogently explain (either in writing or verbally) the world around them (as good geographers do), then we need to go about teaching this deliberately. I think some teachers shy away from this – and some say they ‘do not have time to teach vocabulary, isn’t that for English teachers?’ – however, ultimately, it is obvious:
A. You are the expert in the room.
B. Your pupils deserve to be challenged.

Word consciousness

Word consciousness

That is why my department and I are focusing on keywords and command words at GCSE and A-Level. In truth, I had begun to do this before reading ‘Closing the Vocabulary Gap’, but anyone who has read it will know that Alex provides you with a thousand and one brilliant practical ways to refine your approach to teaching vocabulary, many of which I’ll take up myself this coming year and use to improve this resource. Without wanting to explicitly make the activity fun – after all, any geography teacher will tell you any and all geography-related content is fun (right?) – it has become a little bit of a game, more so with GCSE actually. I am still developing my A-Level approach so I’ll actually only discuss what I do with my Year 10s and 11s.

The goal of this is that the more familiar your pupils are with key terms (or command words), the more comfortable they are with using them verbally and – most importantly – in an exam setting. Obviously, take that with a pinch of salt, I say ‘most importantly’ simply because this concerns GCSE pupils and I understand a lot of you will not see exam performance as the ‘most important’ thing. Ultimately, you are equipping them with the tools to be able to succeed as geographers – because without a robust vocabulary, they will not be able to communicate their wonderful ideas as well as you want them to.


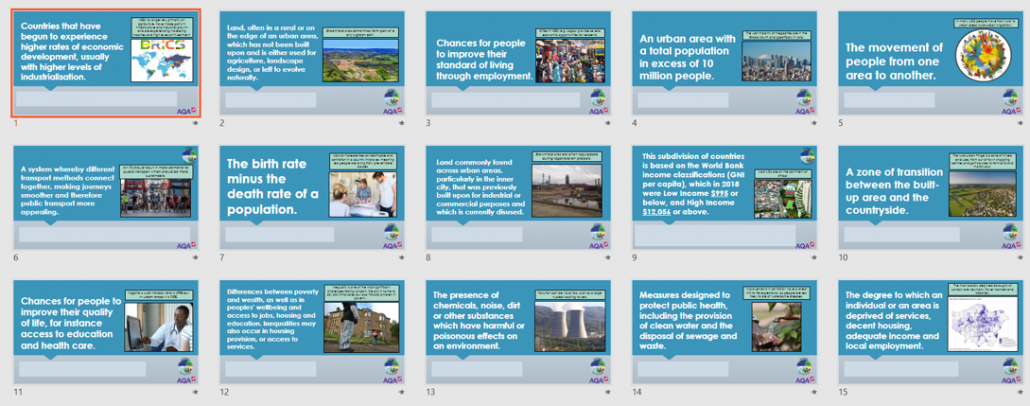
The aim of the game is simple, identify key terms from their definitions. However, its importance to our approach to interleaving to aid long-term memory and recall, as well as the benefits it has on mock exam/exam question performance is unreal. It has variations, of course, and that’s what the printed cards are for (see Google Drive link below): I can get the whole class to complete a pack (e.g. 3.2.1 Urban Issues and Challenges) with me standing at the front giving clues before the bell rings after we’ve packed away, or I can give a pack to pupil, and they have play Articulate with their partner, or I send one pile of cards around the class and we have to get to the person at the back as quickly as possible with only 3 passes – the possibilities are endless. Two things need to stay at the forefront of your teaching whilst doing this, though:
1. Increase the challenge: if they know the words too well after a while, start asking to follow up or probing questions to embed their understanding and fluency with the vocabulary.
2. Do it often: you need to be doing this often but in a planned manner. That way, in an ideal world, your lesson began with the increasingly popular recall Do Now quizzes (e.g. Geog Your Memory, which is @Jennnnnn_x’s I believe?) or the amazing Find it and Fix it (not sure who made this one!) which focused on a variety of past and present topics, and then ends with you picking a set of key terms from the topic you did, say, last half-term and quickly testing your class.

Increase the challenge

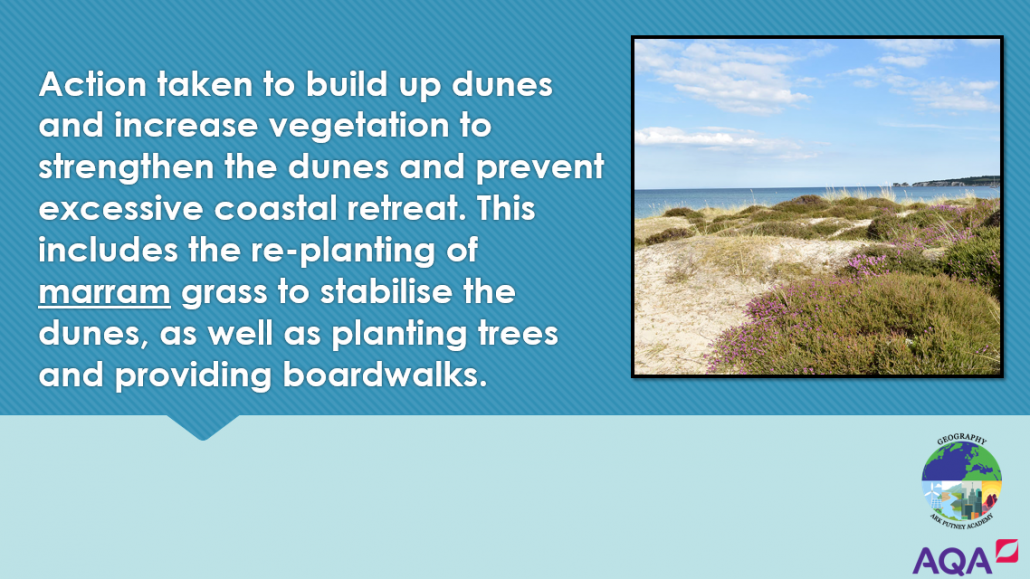
Example of increasing the challenge

Example of increasing the challenge

I won’t patronise you – you know this is referring to dune regeneration, one of three soft engineering strategies mentioned in the AQA GCSE specification. Hopefully, in time, your pupils will become bored of the mere sight of this image and definition as they’ll know it so well. But don’t they just know the image? Aren’t they fooling me? Have some even memorised the order and blurted it out in a concerted effort to get me to stop banging on about this and let them go to break?
No… Not if you follow it up. Great stuff, Ali, you know the definition. But I am not stopping there! Please give me a cost of using sand dune regeneration? And a benefit, please? Where was our example of this being used successfully and what was one of the benefits there? Why is sand dune regeneration significant? Who might disagree with its use? Now Ali does not just remember the image or the definition (although you’ve definitely seared that into his mind!), he remembers the rest. If this appears in the exam or if it could be used in the exam, you’ve helped to equip this pupil with the requisite knowledge of the word to be able to successfully ‘apply’ it (the key element of Assessment Objective 3). You will no doubt have got Ali to use this in a practice exam question but having used it verbally with some confidence (after several attempts, if needed – that is fine), he is slowly becoming an expert of this word. Excellent… one down, hundreds to go!

Do it often
I don’t want to launch into an analysis of the evidence behind interleaving, daily/weekly/monthly reviews or cognitive load theory (partly because it is so widespread nowadays), so I will keep this simple: It is well-known that (good) practice makes perfect, so do not use this sparingly. I see my Year 10s twice a week, so I used it twice a week – simple. It’s mostly at the end of the lesson (although, like I said I can and do mix it up) so there’s a little bit of a routine now, mostly because of my consistent use. As I said, I do not just use this – in fact, I think being too rigid will be counter-productive, bore you, bore the kids and not lead to great results. I mix it up with the Keyword of the Day and something a colleague of mine (@watts_education) introduced me to – the A to Z summariser.

What I do repeat, however, is the focus on making the pupils ‘word experts’ and ultimately more ‘word conscious’; by questioning pupils and discussing words/phrases, especially ones like ‘nutrient cycle’, ‘irrigation’ or ‘agribusiness’ which they won’t hear outside your classroom, they will eventually grow more confident. I remember one of my pupils launching into an explanation of orbital eccentricity and the Milankovitch cycle – 5 months after I’d taught it – when another had responded to a question of mine with a puzzled look. I’ll be honest; whatever you think about the quality of your teaching, the first time this vocabulary-focused approach ‘does this’ to one of your pupils, you too will wear a puzzled look.

Hopefully, this technique, along with the necessary probing questioning, which must accompany it, combined with its repeated use, will help your pupils become just a little bit more ‘word conscious’.

Abdurrahman Pérez (@mr_perez5)
August 2019

The AQA GCSE Geography keywords cards are here: https://drive.google.com/drive/folders/1PFF7PwWKl19wwsjGOSj71qtU4ZaVOhXL?usp=sharing
The AQA A-Level vocabulary is here:
https://drive.google.com/drive/folders/1oMi0u153MA2YN89vD-VghlyT4ocaCICz?usp=sharing
The keyword of the day (adapted Frayer Model): https://drive.google.com/drive/folders/16NpWw2gDtubKsBdj1BL0LFLU0fDIspCV?usp=sharing
A to Z summariser:
https://drive.google.com/drive/folders/1ywNbT5xHp2BOdkkdJE6rz2jfAtYkYAhn?usp=sharing

Internet Geography is offering a platform for guest bloggers for this academic year. Got a teaching strategy, interest or anything geographical you’d like to share? Please contact us. We’re unable to offer a financial award but we’ll send you a little treat in the post.

How to THINK STEEP in Geography, life, the universe and everything!

Guest blogger Josie Luff (@geojosie) discusses the evolution of STEEP, a great technique to encourage students to think synoptically.

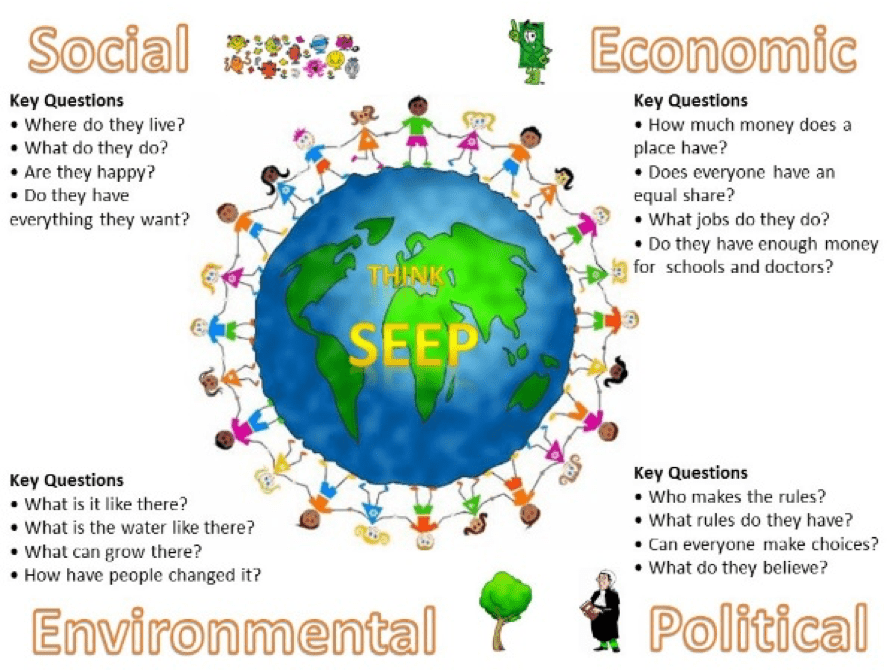
I’ve been using SEEP (Social, Economic, Environmental, Political) in my Geography lessons since I started ‘formally’ teaching as an NQT 12 years ago.

I was reading through the Examiners Comments on some A level specifications for that years’ exams and noticed they were bemoaning a ‘lack of synopticity’.  Being a mature student of Geography at the wonderful Open University and gaining QTS later in life, I was embarrassed to admit it was not a term I had come across before.  What can ‘synopticity’ mean?  And, more importantly, if I didn’t know what it meant, how would my students?


Having attended a course on ‘Teaching A-Level’ with @jmbgeog during my NQT year, I began to understand.  But how could I get this across to my students and teach them to not only use and include synopticity in their Geography thinking, speaking and writing, but to see the world and ask questions about people and places outside of my classroom with their Geography hats on?

I needed my students to see the context of a place, not just the surface views offered by looking at an isolated natural hazard or a change in population structure.  I needed them to see, know, understand and question the wider view of a place.

And so, SEEP was born.

SEEP

SEEP

I created a selection of questions that I wanted my students to ask about a place and then be able to answer once they had learned about it.  The original questions would then hopefully lead onto them asking other questions and could be used by me to prompt them into using the specific keyword language of Geography.  I then categorised these questions into Social, Economic, Environmental and Political. While Social, Economic and Environmental are relatively self-explanatory and data-rich, I decided on Political as I wanted to include the history of a place and how this history, both modern and pre-modern, impacts on a place today.  Equally, Political also contains questions about rules, beliefs, traditions and cultures to enable my students to understand WHY some things can/can’t or do/don’t happen in a place and whether it is the same for everyone in that place.


As time moved on, I began to think about the use of technology in my classroom, my teaching and my student’s lives.  Everyone has a phone, don’t they?  The first iPhone was available in 2007.  That’s the year my current Year 7’s and Year 8’s were born.  They have never NOT been connected to the wider world, but they needed to understand HOW that world worked, or not.

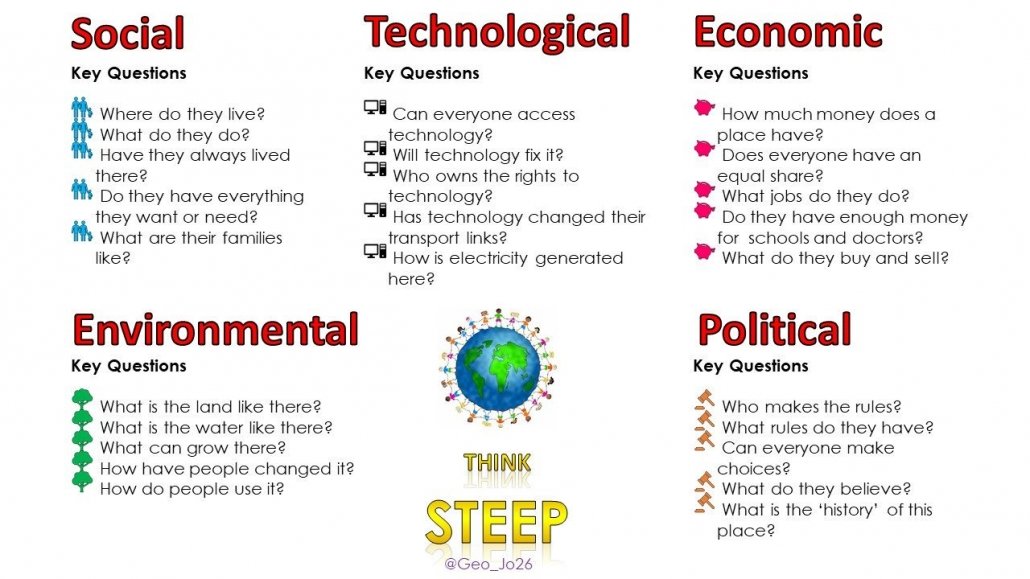
SEEP became STEEP.

STEEP - encouraging learners to think synoptically

STEEP – encouraging learners to think synoptically

Each September, I begin my first lesson with STEEP and some images of an event or place that has been in the news in the past year. We start with @geography_meg  wonderful CLOCC to get them looking in an atlas to find out where this place is, whether it is connected or not to other places and to find out what they might already know about it.  This can take a while as they ‘discover’ things they didn’t know (including how to use the Index!).  We try to work out WHAT it is like for the people that live there (sometimes getting side-tracked looking at the amazing Dollar Street website www.gapminder.org/dollar-street), but also WHY it is like this.  Next, we look at the natural environment of a place, the climate, geology and the natural resources and how this has helped or hindered development and whether technology or lack of it, has made a difference to this place.  We use facts and data to look at whether everyone has everything they need, socially, environmentally and economically but also investigate HOW histories, connections, beliefs, traditions, languages, and cultures have created this place to be the way it is now.

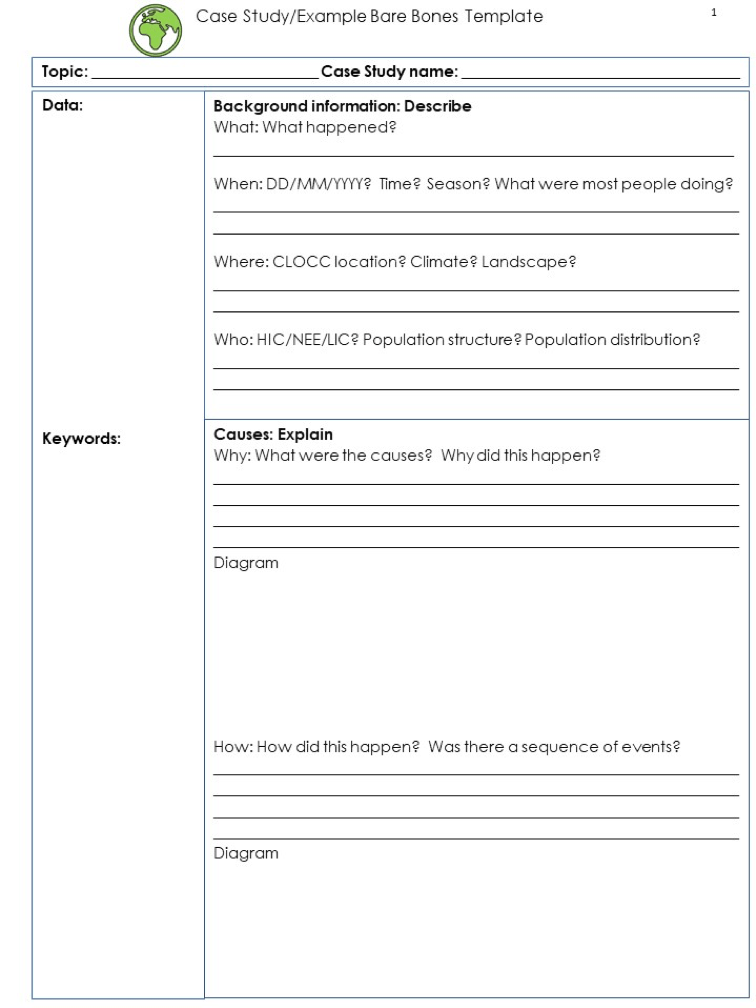
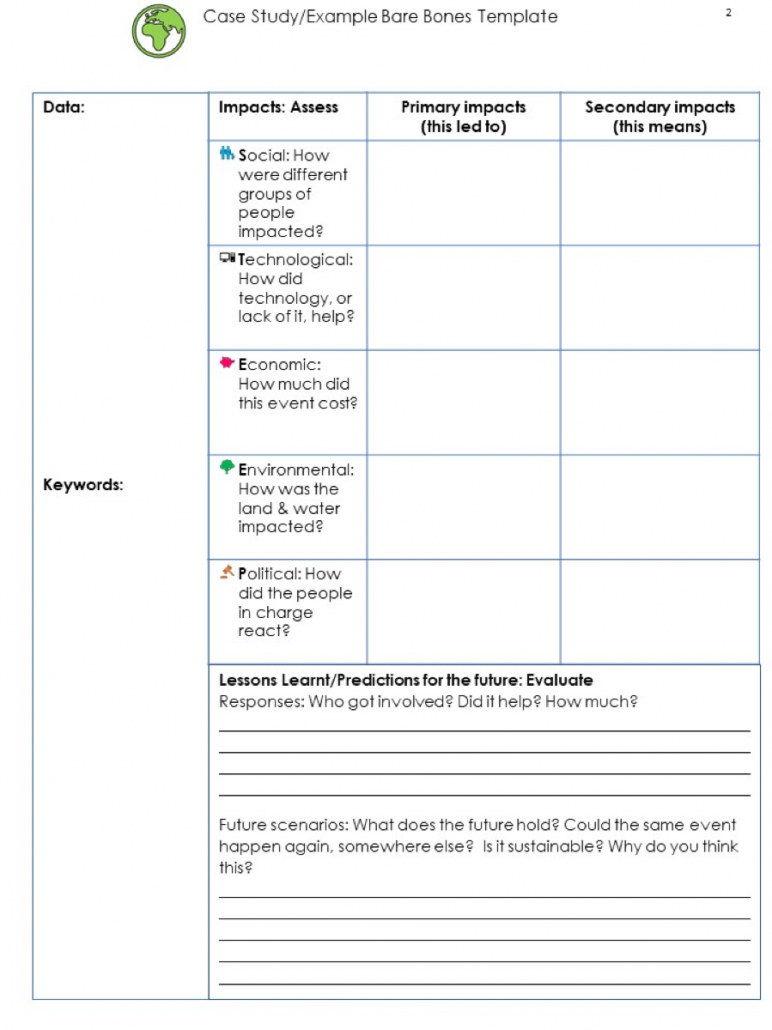
When investigating a Case Study, we collect our STEEP learning on a Case Study Sheet so we can return to it for facts, knowledge and our synoptic thinking.

Case study bare bones template

Case study bare bones template

Case study bare bones template 2

Case study bare bones template

Click to download resources

By doing this, I’ve found my students have a much wider view of the world and that to truly be an #ExcellentGeogapher they need to know I will not accept ‘because it’s hot’ as a good enough answer!

We investigate the world, it’s people and places, synoptically!

Josie Luff
August 2019

Internet Geography is offering a platform for guest bloggers for this academic year. Got a teaching strategy, interest or anything geographical you’d like to share? Please contact us. We’re unable to offer a financial award but we’ll send you a little treat in the post.